Autonomous Timelapse Troubleshooting
If the Autonomous Timelapse or the Hibernation feature is not working properly during the Bench Testing, please follow the steps below to try and resolve the issue. For the Hibernation version, please make sure the Wake-Up switch is in the off state when you want to test a hibernate cycle on the bench.
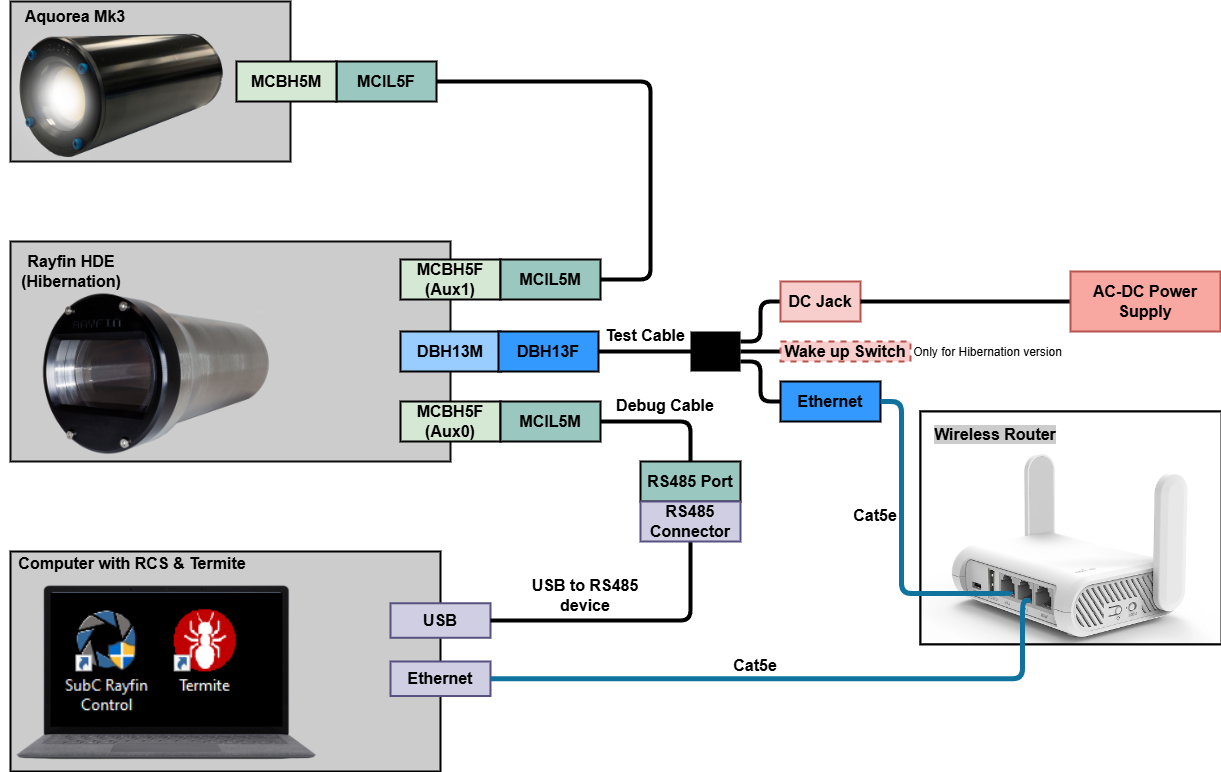
The system should be set up and wired as illustrated in the below diagram.
Setting Up the Serial Logger
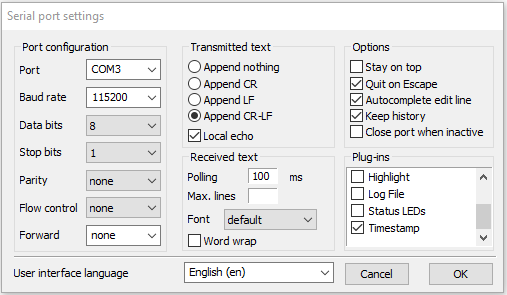
Open Termite. Click “Settings” and set the settings to match the picture below. The Serial Port number may be different depending on how many serial devices are connecting to your computer. Choose the new serial port which adds to the list as you connect the USB to the RS485 device. The only plug-in that should be checked off is “Timestamp”.
If you do not have Termite on your computer, install it from the USB flash drive.
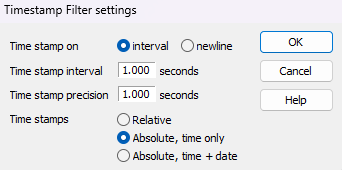
Double-click on the word “Timestamp” under the “Plug-ins” section and change the settings to the ones shown in the window below.
Click OK in the “Timestamp Filter settings” and the “Serial port settings” to return to the main Termite window.
Testing the Script & Interpreting the Serial Communications
When the Rayfin is turned on, there should be a significant amount of activity in the Termite window, this is every action that the camera performs as well as readings from the various sensors within the camera. This can be overwhelming at first, but there are specific commands to look for to diagnose the issue with the Hibernation function.
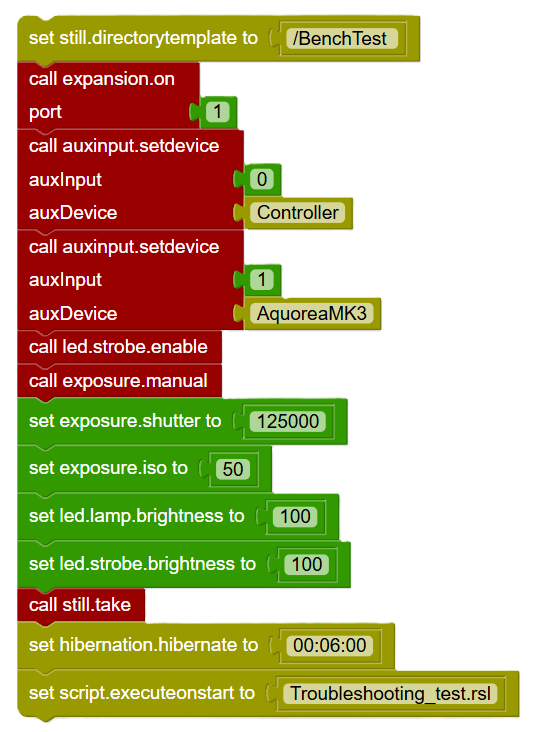
Execute the Test Script that is given below. As it is running we can check Termite to troubleshoot the issue. The test script is shown below:
As the script is executing, look back through the communications in Termite. Each section of the script and the functionality of those lines can be verified by matching the Termite commands below with the commands that you see in your Termite window.
The lines below may not appear in your Termite window as they are shown below. There may be other communications mixed between the lines below and the order of some of the lines may be different. This is expected, as long as the lines are present in the communications then that means that the section of the script that it is associated with is functioning as normal.
Initializing the Test Script
Upon executing the test script, the following lines should be visible in Termite.
<0Script:/storage/emulated/0/Scripts/BenchTesting.rsl   // Designates script to run
<0IsScriptRunning:True                            // Initiates the script listed above
Script Section 1 - set still.directorytemplate to /BenchTest
<0ScriptExecutionIndex:0          // First section of the script is being executed
<0StillsDirectory:/BenchTest      // Set stills directory
Script Section 2 - call expansion.on port 1
<0ScriptExecutionIndex:1    // Second section of the script is being executed
@aux1power:1                // Turning on power to aux1
<0ProductSerialNumber1:SUBCXXXXX    // Serial Number of the Aquorea Mk3 will be here
Script Section 3 - call auxinput.setdevice auxiInput: 0, auxDevice: Controller
<0ScriptExecutionIndex:2    // Third section of the script is being executed
@aux0devicetype:8
@aux0device:Controller
@aux0driverbaud:115200
@aux0drivermode:RS485
@NAK aux0 set drivermode:1
@aux0driverbaud:115200
<0Device0:Controller
Script Section 4 - call auxinput.setdevice auxiInput: , auxDevice: AquoreaMk3
<0ScriptExecutionIndex:3    // Fourth section of the script is being executed
@aux1devicetype:4
@aux1device:Hex Controller
@aux1lampoutput:0
@aux1strobeoutput:0
@aux1driverbaud:115200
@aux1drivermode:RS485
@NAK aux1 set drivermode:1
@aux1driverbaud:115200
@aux1strobeoutput:100
@aux1lampoutput:0
<0ProductState:READY
<0ProductSerialNumber1:SUBCXXXXX
<0Device1:Aquorea Mk3
Script Section 5 - call led.strobe.enable
<0ScriptExecutionIndex:4    // Fifth section of the script is being executed
<0IsStrobeEnabled:True      // Strobe is enabled
Script Section 6 - call exposure.manual
<0ScriptExecutionIndex:5    // Sixth section of the script is being executed
<0Exposure:Manual           // Exposure is set to manual
<0IsAutoExposure:False      // Auto Exposure is turned off
Script Section 7 - set exposure.shutter to 125000
<0ScriptExecutionIndex:6    // Seventh section of the script is being executed
<0ShutterSpeed:125000       // Shutter speed setting set to  125000 (1/16000)
<0IsAutoExposure:False      // Auto Exposure is turned off
Script Section 8 - set exposure.iso to 50
<0ScriptExecutionIndex:7      // Eighth section of the script is being executed
<0ISO:50                      // ISO setting set to 50
Script Section 9 - set led.lamp.brightness to 100
<0ScriptExecutionIndex:8       // Ninth section of the script is being executed
<0LampBrightness:100           // Aquorea Mk3 Lamp brightness set to 100%
Script Section 10 - set led.strobe.brightness to 100
<0ScriptExecutionIndex:9       // Tenth section of the script is being executed
<0StrobeBrightness:100         // Aquorea Mk3 Strobe brightness set to 100%
Script Section 11 - call still.take
<0ScriptExecutionIndex:10      // Eleventh section of the script is being executed
<0CanTakePicture:False         // Verification that another still cannot be taken
<0Still captured               // Still captured
<0CanTakePicture:True          // Verification that another still can be taken
<0Saving...                    // Still being saved
<0@[01][02]Still saved: /mnt/expand/3f00b18d-a2c5-4634-a5eb-40025f17deba/Be[03]
<0@[02]nchTest/2023-02-10 - 001441.jpg[03][04]   // Name of the still that was saved
Script Section 12 - set hibernation.hibernate to 00:06:00
<0ScriptExecutionIndex:11           // Twelfth section of the script is being executed
************************* Hibernation: SET *************************
Total Remaining Seconds: :360       // Initializing hibernation timer of 12 mins
Script Section 13 - set script.executeonstart to Troubleshooting_test.rsl
<0ScriptExecutionIndex:12         // Thirteenth section of the script is being executed
<0ExecuteOnStart:True             // Script is set to execute when the camera starts up
End of Hibernation Cycle
@productfirmware:SubC Rayfin v10.20 (compiled Thu Feb 09 17:22:14 2023)
@productsn:SUBCXXXXX
@productstate:BUSY_SUBCXXXXX
@productname:Rayfin
@producthardware:DB Hibernate Snooze

---- Power Supply ----
@powershutdowndelay:10
@powershutdowntimeout:30
@powersystem:1
Android 1.8 V power on:1

---- Hibernate ----
Hibernate Remaining:22s State:0
@hibernateperiod:222

---- Comms ----
@commsversion:2
@commsmultidrop:0

---- Sensors ----
@sensortimermode:2
@sensortimer:10
@sensortemp:24.99
@sensortemphigh:51.79
@sensortemplow:17.93
22:16:33: @sensortemptarget:21.50
@sensorhumidity:nan
@sensorruntime:21:54:34

---- Aux Devices ----
@aux0devicetype:8
@aux0device:Controller
@aux0driverbaud:115200
@aux0drivermode:RS485

@aux1devicetype:4
@aux1device:Hex Controller
@aux1lampouôput:0
@aux1strobeoutput:0
@aux1driverbaud:115200
@aux1drivermode:RS485


---- Expansion ----
@expmode:9
@exp:Hibernation

---- NMEA Printer ----
@nmeatimer:1.000
IMU not present.
@productstate:HIBERNATE_SUBC22460
@productstate:ON_SUBCXXXXX
Starting Up & Initializing Script
@expmode:9
@exp:Hibernation
@aux0devicetype:8
@aux0device:Controller
@aux0driverbaud:115200
@aux0drivermode:RS485
@NAK aux0 set drivermode:1
@aux0driverbaud:115200
@NAK aux0 set drivermode:1
@aux0driverbaud:115200
@aux1devicetype:4
@aux1device:Hex Controller
@aux1lampoutput:0
@aux1strobeoutput:0
@aux1driverbaud:115200
@aux1drivermode:RS485
@NAK aux1 set drivermode:1
@aux1driverbaud:115200
@aux1strobeoutput:100
@aux1lampoutput:0
<0Device1:Aquorea Mk3
@NAK aux1 set drivermode:1
@aux1driverbaud:115200
<0ExecuteOnStart:True
<0@ExecuteOnStartScript:/storage/emulated/0/Scripts/BenchTest.rsl
@productfirmware:SubC Rayfin v12.1.6 (compiled Tue Oct 08 15:44:25 2024)
@sensorhumidity:13.36
<0FirmwareVersion:SubC Rayfin v10.20
<0Humidity:13.36
@sensortemp:25.49
@sensortemphigh:51.79
@sensortemplow:17.93
@sensortemptarget:21.50
<0IsHorizontalOrientation:False
@nmeaimuupdate:0000000
@nmeatimer:1.000
@nmeafusion:1
@nmea set imu axis remap:-z:-x:-y
<0AmbientTemp:25.49
If any of these commands are not present in the Termite communications, please ensure that your script is made correctly.
If you have any additional problems please contact support@subcimaging.com.