Media Capture Wizard
The Media Capture Wizard is used to set up the Blackbox and Media Capture folders to store Channel Input video recordings, framegrabs and still photo files.
The differences between Blackbox and Media Capture are:
Blackbox is similar to an airplane flight data recorder in that it continuously records the Channel Input video (as .mp4 files) in the selected Blackbox folder.
Media Capture also records the Channel Input video but only for the duration between when you click the Start and Stop Recording button (as .mp4 files). When you click on the Camera icon to take framegrabs or stills, those are also saved (as .jpg files) in the selected Media Capture folder.
The Show Media Capture Wizard checkbox appears at the bottom-left on each of the Input Source (Rayfin, Capture Card, IP Camera, Presentations, Screen Capture, Secure Edge) screens.
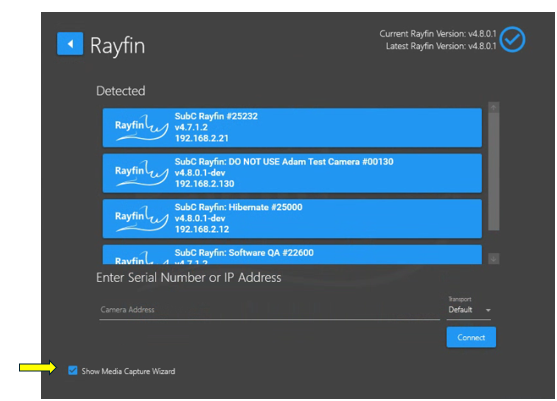 | If Show Media Capture Wizard is selected, when you click Connect, the Blackbox and Media Capture configuration panels will appear. |
|---|
Configuring the Blackbox and Media Folder is optional when configuring Channel Input.
If you previously selected your Blackbox &/or Media Folders, you could skip Show Media Capture Wizard.
See Menu → Recording Settings → Blackbox
See Folder/Filename Settings for Regular Recording and Stills
Local Drive: If you are setting a directory path to a local drive on the system, you can use the drive letter. Example: D:\folder
NAS Drive: If you wish to set a directory path to a networked drive, you must provide the UNC Path. Example: \\ipaddress:\folder
Media Capture Wizard → (1) Black Box
The Black Box configuration wizard panel appears first.
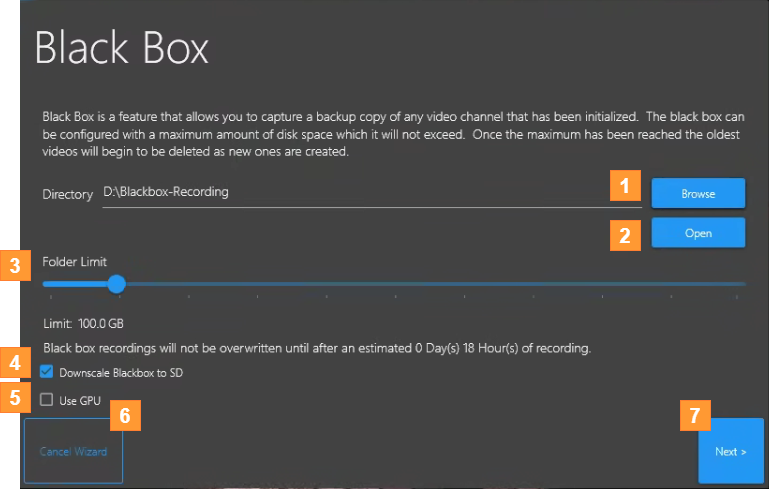
Browse - select a Directory where you want to save the Blackbox recording files.
Open button to open a File Explorer window to the Blackbox Directory.
(The Open button appears under the Browse button after the Directory is selected)
Folder Limit - move slider button or use the left/right arrow keys to decrease/increase to the desired Blackbox folder size.
Downscale Blackbox to SD - Downscale from HD (High Definition) to SD (Standard Definition)
Use GPU - Select to utilize the systems GPU (Graphic Processing Unit) rather than the system CPU (Central Processing Unit).
Cancel Wizard - click if you wish to close the Media Capture Wizard.
Next - to proceed to the Media Capture to configure your Recording & image files location and preferences.
For convenient accessibility, the Blackbox Start | Stop toggle button is located left of the Recording, Stills and Stream buttons at the center, bottom of the DVR+ / SCI UI
Also, see Menu → Blackbox Settings for more information
Media Capture Wizard → (2) Recordings & Images
When you click Next, the Media Capture configuration panel to configure your Recording & image files location and preferences appears.
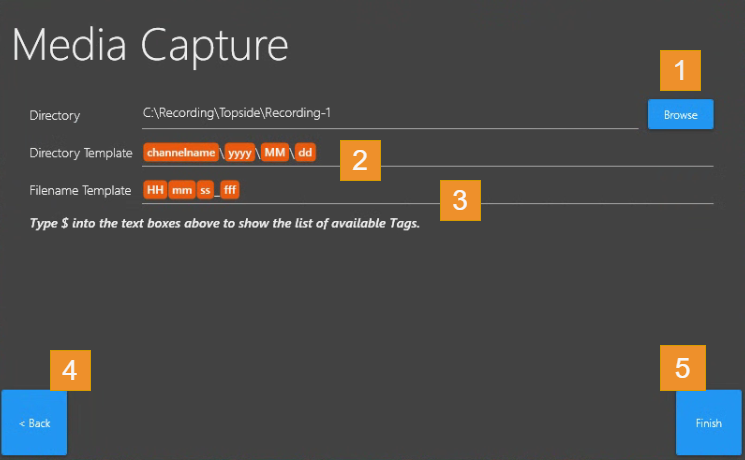
Browse to select a Directory where you want to save Recording & image files.
Directory Template populates with a default format: ${channelname}\${yyyy}\${MM}\${dd}
You can edit this format using Tags.Filename Template populates with the default format: ${HH}${mm}${ss}${fff}
You can change the Filename Template format, however, this default format ensures that each time you stop and start recording you will be starting on a unique filename and not overwriting the previous recording file. You can edit this format using Tags.Back to return to the previous Blackbox configuration UI
Finish to complete the Media Capture Wizard configuration.
Using Tags can speed up post processing time to get results more quickly by allowing users to have better control over the directory structure and keep like files together.
See Directory Filename Tags for details.
If the drive that holds your Directory folder becomes close to full, the DVR+ will stop Recording and will give you this message, for example:
“The drive E:\ is full. Please clear up space or switch to another drive.”
