Rayfin Static IP
Rayfin Input Feature

Select Menu → Rayfin Static IP
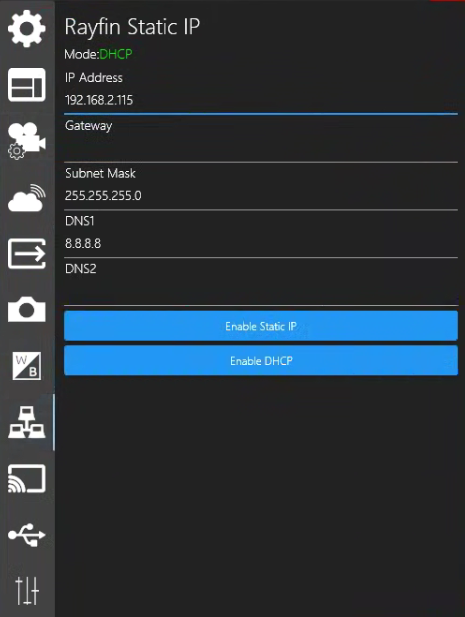
The Rayfin Static IP settings allow you to change the IP of the Rayfin Camera connected to the current Channel between Mode: DHCP IP & Static IP.
DHCP and Auto Detection
The Rayfin auto detect polls the network to find Rayfin cameras using the Onvif protocol
A DHCP server (often a router) will automatically assign an IP address to each device connected to the network.
Auto detection works when the camera is configured for DHCP.
Enable Static IP
When assigning a Static IP to the Rayfin, the camera, and the control PC must be on the same network subnet. Static IP does not require a DHCP server (router) and will work with a simple switch.
Example:
Rayfin -> IP: 192.168.10.40 Subnet mask: 255.255.255.0
PC -> IP: 192.168.10.5 Subnet mask: 255.255.255.0
Configuration
In order to set up static IP, you will need to first connect the Rayfin to a DHCP in order to connect to it and configure the static IP. SubC provides a pocket router for bench testing and configuration.
IP address → Enter the IP Address; Double check that the first three numbers match your PC.
Gateway → Enter the Network Gateway IP Address; If using an unmanaged switch, set the gateway to 0.0.0.0 which means "unspecified" for network standards.
A gateway is a hardware device that acts as a "gate" between two networks. It may be a router, firewall, server, or another device that enables traffic to flow in and out of the network.Subnet Mask → Enter the Network Subnet Mask; the Default subnet mask is often 255.255.255.0 but check with your IT/Network Administration Team.
A subnet mask is used to divide an IP address into two parts. One part identifies the host (computer), and the other part identifies the network to which it belongs.DNS1 (DNS2 optional) -->Default DNS is often 8.8.8.8 but check with your IT/Network Administration Team.
Domain Name System is a hierarchical naming system built on a distributed database for computers, services, or any resource connected to the Internet or a private network.Click the Enable Static IP button
Once a static IP is configured your camera connection will close and you can reconnect using the new IP.
In case of a static IP misconfiguration resulting in the camera becoming unreachable there is a built-in failsafe. Power cycle the Rayfin, it will take about 40 seconds to boot up after which it will enter DHCP mode for a grace period of 50 seconds. During that time you can connect to it on the DHCP address and remove the problematic static IP configuration. Thus, with Static IP enabled, when you power cycle the Rayfin it will be 90 seconds before you can connect to the camera’s static IP.
Enable DHCP
If you have used the same gateway and subnet mask as the DHCP server when setting the static IP, then the camera should be discoverable and you can simply connect to it and click Enable DHCP.
If you have set the camera to a different IP and Gateway than your DHCP server or incorrect settings and you cannot find it, there is a way to recover. We have built in a 50-second grace period where the camera boots in DHCP mode.
Connect the Rayfin camera to a DHCP host (router)
Connect the PC to the same DHCP host. Open the control software
Power up the camera. Wait for 30-40 seconds and the camera will appear in the Auto detection list
Connect and quickly Enable DHCP
If you miss it and the 50 seconds elapse, it will switch to static IP and you will need to power cycle again
Ethernet Ports
Some firewalls may need certain ports unblocked to enable all functions
Function | Ethernet Port |
RTSP video | 5540 |
UDP data logging output | 8886 |
TCP/UDP data logging input | 8889 |
TCP camera control | 8888 |
UDP camera control | 8887 |
Incoming NTP port | 123 UDP |
REST | 8080 |