API for Inspector
Table of Contents
Introduction
The API commands in this document will allow developers to create their own Inspector type applications. This document contains information used to:
Check if the DVR+O / SCI application is ready to take API commands.
Set directory path(s) as needed for storing recordings and video framegrab.
And starting and stopping video recordings and taking video framegrab.
Also, included is a logic flowchart of some basic when it comes to programming with the system.
Quick Commands
The table below shows all of the REST API commands which can be executed in a web browser or a program such as Postman.
Included in the table is:
URL - Sample URL + Command (http://127.0.0.1:13000/api/stats/<command>).
Method - Command execution (GET/POST).
Body - Command syntax use when submitting a POST command.
Response(s) - Output examples from the DVR+O REST API commands.
URL | Method | Body (POST Commands) | Response(s) | Description |
|---|---|---|---|---|
http://127.0.0.1:13000/api/stats/ping | GET | N/A | Normal - Successful
Failed
| Ping command is used for testing connectivity between hosts and debugging connectivity-related issues. Ping command sends packets of data to a device and measures the response time. |
http://127.0.0.1:13000/api/recordersettings/apply NEW | POST |
CODE
| Normal - Successful
Failed
| Master camera settings sync when not using smart encoding. |
http://127.0.0.1:13000/api/inspector/createdirectory NEW | POST |
CODE
| Normal - Successful
Failed
| Create the directory where recording files will be saved. |
http://127.0.0.1:13000/api/inspector/recordingdirectory | POST |
CODE
| Normal - Successful
Failed
| Set the directory on all recordings. |
http://127.0.0.1:13000/api/inspector/inspectiondirectory | POST |
CODE
| Normal - Successful
Failed
| Set the base directory on all channels. |
http://127.0.0.1:13000/api/inspector/splittime/{SplitTimeMinutes} NEW | GET | N/A | Normal - Successful
Failed
| Set the time duration (in minutes) for when the video file splits / spawns another video recording file. |
http://127.0.0.1:13000/api/inspector/reevaluatetags/{ReevaluateTags} NEW | GET | N/A | Allowed Tags
Normal - Successful
Failed
| Reevaluate tags on split: When selected, will modify the filename of recorded video files each time it splits according to the tags in the Filename Template. |
http://127.0.0.1:13000/api/inspector/pathtemplate NEW | POST |
CODE
| Normal - Successful
Failed
| Sets the templates for inspection, filename, directory, etc such that the tags ( |
http://127.0.0.1:13000/api/inspector/pathtemplate NEW | GET | N/A | Normal - Successful
Failed
| Get the currently assigned path template. |
http://127.0.0.1:13000/api/inspector/startrecording | GET | N/A | Normal - Successful
Failed
| Master start recording for all channels |
http://127.0.0.1:13000/api/inspector/stoprecording | GET | N/A | Normal - Successful
Failed
| Master stop recording for all channels |
http://127.0.0.1:13000/api/inspector/isrecording | GET | N/A | Normal - Successful
Failed
| Check to confirm the recording is still running. |
http://127.0.0.1:8088/api/recording/encoderrunning (Same as http://127.0.0.1:8088/api/recording/isrecording ) | GET | N/A | This REST API command is part of the service running on port 8088 under the path “/api/recording/isrecording” or “/api/recording/encoderrunning“. Normal - Successful
Failed
| Returns a value indicating if a video is actively recording. Both isrecording and encoderrunning perform the same. |
http://127.0.0.1:13000/api/inspector/takeframegrab | GET | N/A | Normal - Successful
Failed
| Take a video framegrab. |
http://127.0.0.1:13000/api/inspector/startclip | GET | N/A | Normal - Successful
Failed
| Start recording a video clip.
|
http://127.0.0.1:13000/api/inspector/stopclip | GET | N/A | Normal - Successful
Failed
| Stop recording a video clip. |
http://127.0.0.1:13000/api/inspector/iscliprecording | GET | N/A | Normal - Successful
Failed
| Gets a value confirming if a video clip is actively recording. |
Postman Commands
In this section, we show how to use Postman to send Inspector commands to the running DVR+O application.
Check if the REST API is Ready?
You can send a ping command to the DVR+O system to check if the inspector system is ready to start taking commands.
This comes in handy if the DVR+O application was closed, you would be notified the ping failed and then check to ensure the DVR+O application is started.
Steps:
Open Postman.
Login to your Postman account.
Create a new tab.
Ensure the type is GET
Update the textbox to “http://127.0.0.1:13000/api/stats/ping”.
Remember to change the 127.0.0.1 to the IP address of the PC that is hosting the DVR+O you are targeting.Click the Send button.
Use Multichannel Recording Feature
@a user Insert a description.
Steps:
Open Postman.
Login to your Postman account.
Create a new tab.
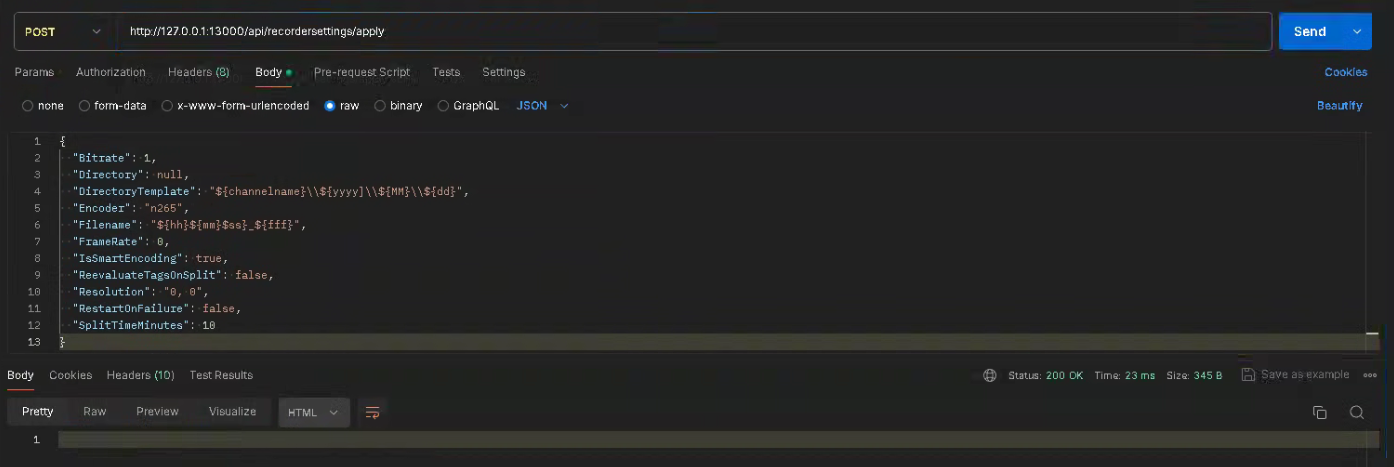
Change from GET to POST.
Update the textbox to “http://127.0.0.1:13000/api/recordersettings/apply“.
Remember to change the 127.0.0.1 to the IP address of the PC that is hosting the DVR+O you are targeting.Click on the Body sub tab.
Click the option “raw” and change the drop-down from Text to JSON.
Paste in the JSON template..
CODE{ "Bitrate": 1, "Directory": null, "DirectoryTemplate": "${channelname}\\${yyyy]\\${MM}\\${dd}", "Encoder": "n265", "Filename": "${hh}${mm}$ss}_${fff}", "FrameRate": 0, "IsSmartEncoding": true, "ReevaluateTagsOnSplit": false, "Resolution": "0, 0", "RestartOnFailure": false, "SplitTimeMinutes": 10 }Click the Send button.
Creating a Directory/Folder
If you wish to create a directory/folder using the API.
Steps:
Open Postman.
Login to your Postman account.
Create a new tab.
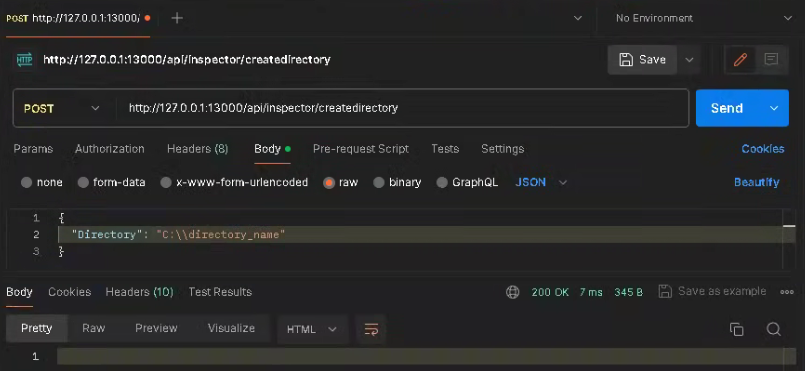
Change from GET to POST.
Update the textbox to “http://127.0.0.1:13000/api/inspector/createdirectory”.
Remember to change the 127.0.0.1 to the IP address of the PC that is hosting the DVR+O you are targeting.Click on the Body sub tab.
Click the option “raw” and change the drop-down from Text to JSON.
Paste in the JSON template
{ "Directory": "new_directory_name" }.Click the Send button.
Ensure that all backslashes are escaped with an addition backslash "\"
Example: “C:\\tmp\\Data1”
Setting the Recording Directory
It’s important to set the recording directory before starting a recording. If you do not, the system running the DVR+O software will prompt you to select which directory save your recording files.
Also, this must be done each time the DVR+O software is started.
In order to set the recording directory, you need to send a POST REST API command to the system running the DVR+O software. Please ensure you have opened the firewall to access port 13000 to get the request into the system. We will be using Postman to send REST API called to the system.
Steps:
Open Postman.
Login to your Postman account.
Create a new tab.
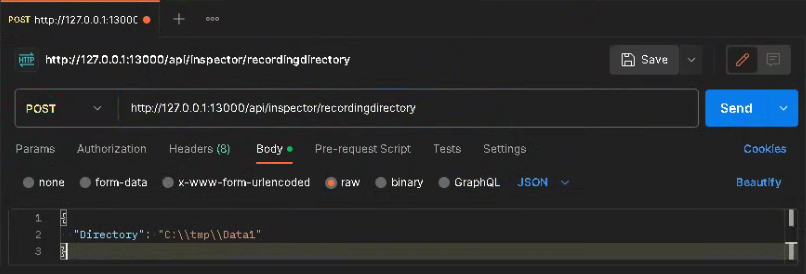
Change from GET to POST.
Update the textbox to “http://127.0.0.1:13000/api/inspector/recordingdirectory”.
Remember to change the 127.0.0.1 to the IP address of the PC that is hosting the DVR+O you are targeting.Click on the Body sub tab.
Click the option “raw” and change the drop-down from Text to JSON.
Paste in the JSON template
{ "Directory": "target_directory" }.Click the Send button.
Ensure that all backslashes are escaped with an addition backslash "\"
Example: “C:\\tmp\\Data1”
If you set a directory that is not created yet, when you start a recording the DVR+O system will create the directory for you.
Setting the Inspection Directory
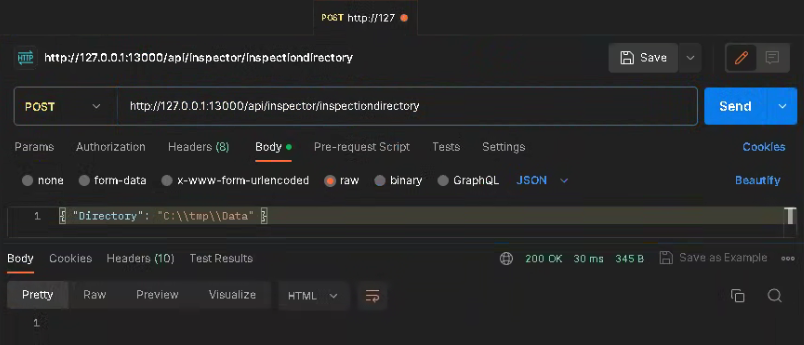
This is a POST command to set the Inspection directory. Items included in this are frame grabs and clips.
Steps:
Open Postman.
Login to your Postman account.
Create a new tab.
Change from GET to POST.
Update the textbox to “http://127.0.0.1:13000/api/inspector/inspectiondirectory.
Remember to change the 127.0.0.1 to the IP address of the PC that is hosting the DVR+O you are targeting.Click on the Body sub tab.
Click the option “raw” and change the drop-down from Text to JSON.
Paste in the JSON template
{ "Directory": "target_directory" }.Click the Send button.
Update Split-Time
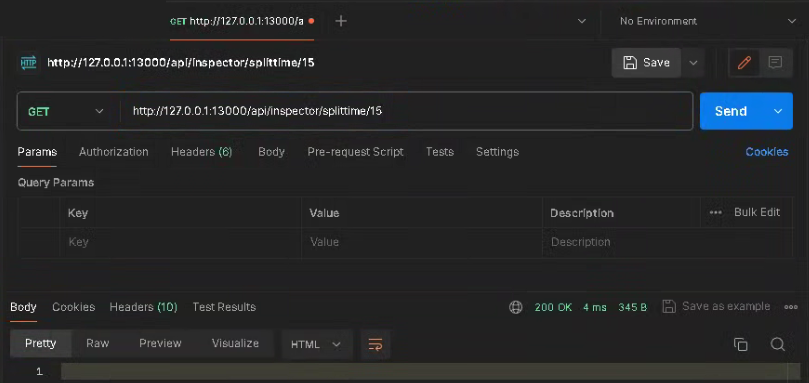
You can change the split time using the API.
Steps:
Open Postman.
Login to your Postman account.
Create a new tab.
Ensure the type is GET
Update the textbox to “http://127.0.0.1:13000/api/inspector/splittime/{SplitTimeMinutes}“.
Remember to change the 127.0.0.1 to the IP address of the PC that is hosting the DVR+O you are targeting.Click the Send button.
Enable Re-Evaluate Tags Option
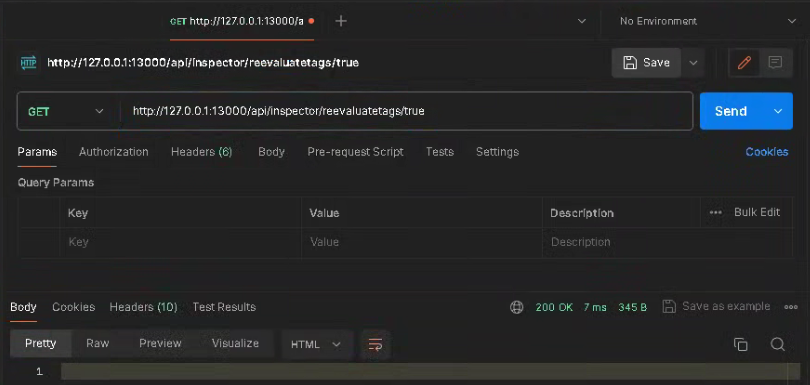
Open Postman.
Login to your Postman account.
Create a new tab.
Ensure the type is GET
Update the textbox to “http://127.0.0.1:13000/api/inspector/reevaluatetags/{ReevaluateTags=true/false}“.
Remember to change the 127.0.0.1 to the IP address of the PC that is hosting the DVR+O you are targeting.Click the Send button.
Update Path Templates
You can update the path templates
Steps:
Open Postman.
Login to your Postman account.
Create a new tab.
Change from GET to POST.
Update the textbox to “http://127.0.0.1:13000/api/inspector/pathtemplate“.
Remember to change the 127.0.0.1 to the IP address of the PC that is hosting the DVR+O you are targeting.Click on the Body sub tab.
Click the option “raw” and change the drop-down from Text to JSON.
Paste in the JSON template
CODE{ "FilenameTemplate": "${yyyy}${MM}${dd}${hh}${mm}${ss}${fff}@${channelname}", "DirectoryTemplate": "DATA_${yyyy}${MM}${dd}${hh}${mm}${ss}${fff}", "FramegrabTemplate": "${yyyy}${MM}${dd}${hh}${mm}${ss}${fff}@${channelname}", "DataLogTemplate": "${yyyy}${MM}${dd}${hh}${mm}${ss}${fff}@current", "EventTemplate": "${yyyy}${MM}${dd}${hh}${mm}${ss}${fff}", "AnomalyTemplate": "${yyyy}${MM}${dd}${hh}${mm}${ss}${fff}@${channelname}_anomaly", "Directory": "C:\\tmp2" }Click the Send button.
You can provided one of the items in the object or more to be updated.
Get the Current Path Templates Set
If you not sure what path templates are set, the GET version of the command will provide the current values.
Steps:
Open Postman.
Login to your Postman account.
Create a new tab.
Ensure the type is GET
Update the textbox to “http://127.0.0.1:13000/api/inspector/pathtemplate”.
Remember to change the 127.0.0.1 to the IP address of the PC that is hosting the DVR+O you are targeting.Click the Send button.
Start a Recording
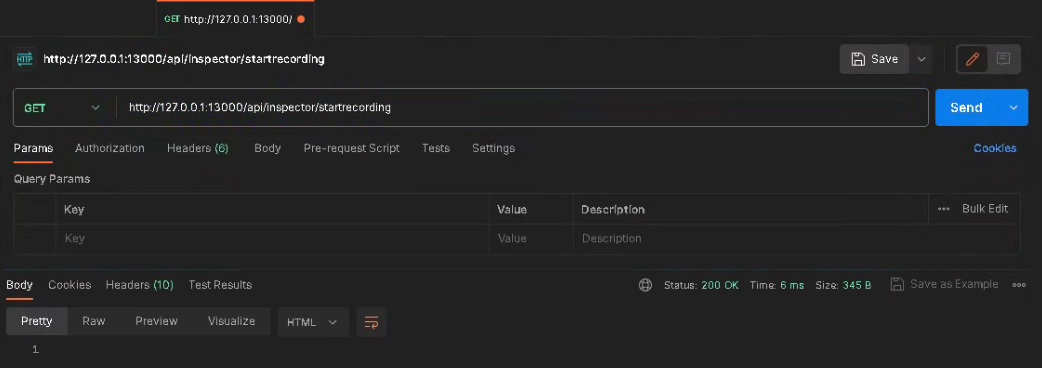
You can send a GET command from Postman or a browser to start a recording. See the steps below for details.
Steps:
Open Postman.
Login to your Postman account.
Create a new tab.
Ensure the type is GET
Update the textbox to “http://127.0.0.1:13000/api/inspector/startrecording”.
Remember to change the 127.0.0.1 to the IP address of the PC that is hosting the DVR+O you are targeting.Click the Send button.
Stop a Recording
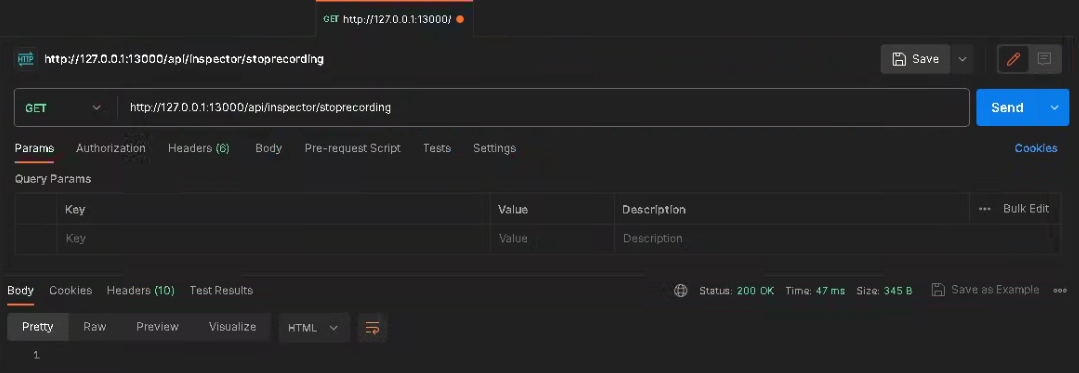
You can send a GET command to stop the recording using the command: “http://127.0.0.1:13000/api/inspector/stoprecording”.
See the steps below for details.
Steps:
Open Postman.
Login to your Postman account.
Create a new tab.
Ensure the type is GET
Update the textbox to “http://127.0.0.1:13000/api/inspector/stoprecording”.
Remember to change the 127.0.0.1 to the IP address of the PC that is hosting the DVR+O you are targeting.Click the Send button.
Check if the Recording has Started.
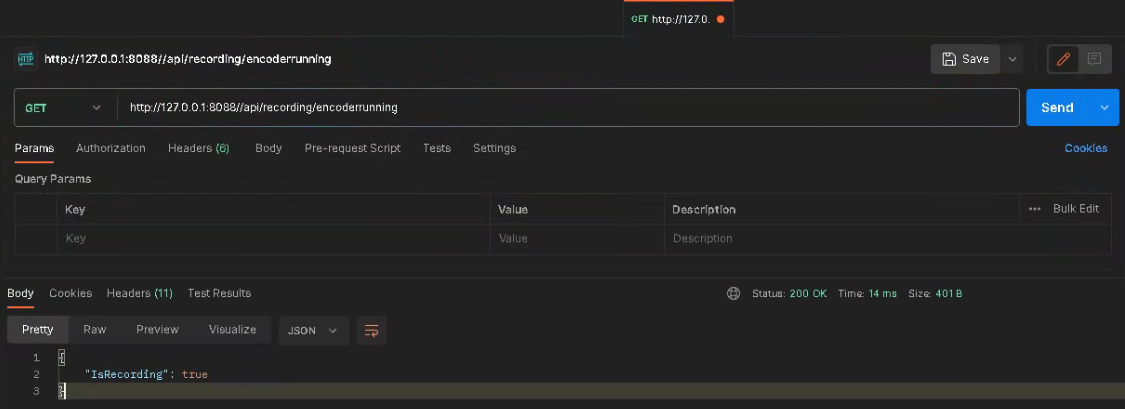
You can check if the recording has started by using the “isrecording” or “encoderrunning“ commands.
Steps:
Open Postman.
Login to your Postman account.
Create a new tab.
Ensure the type is GET
Update the textbox to “http://127.0.0.1:13000/api/inspector/encoderrunning” or “http://127.0.0.1:13000/api/inspector/isrecording”.
Remember to change the 127.0.0.1 to the IP address of the PC that is hosting the DVR+O you are targeting.Click the Send button.
Take a Framegrab
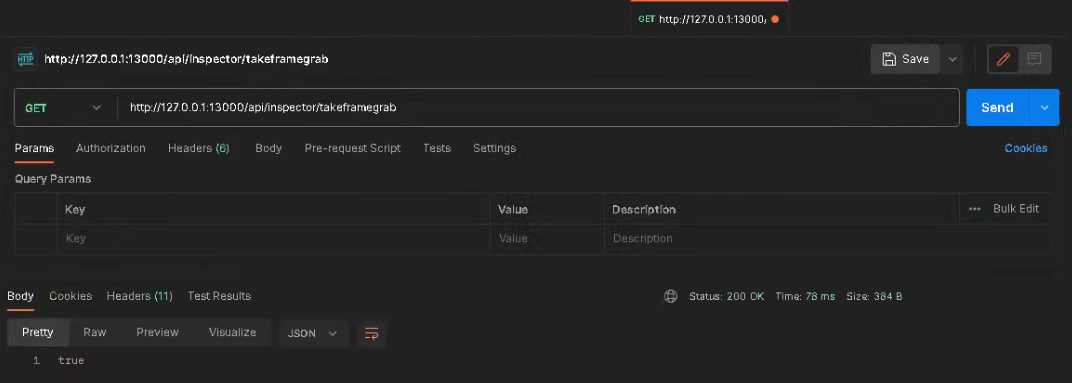
You have the option of taking a framegrab of the current image being displayed.
Steps:
Open Postman.
Login to your Postman account.
Create a new tab.
Ensure the type is GET
Update the textbox to “http://127.0.0.1:13000/api/inspector/takeframegrab”.
Remember to change the 127.0.0.1 to the IP address of the PC that is hosting the DVR+O you are targeting.Click the Send button.
Start a Video Clip
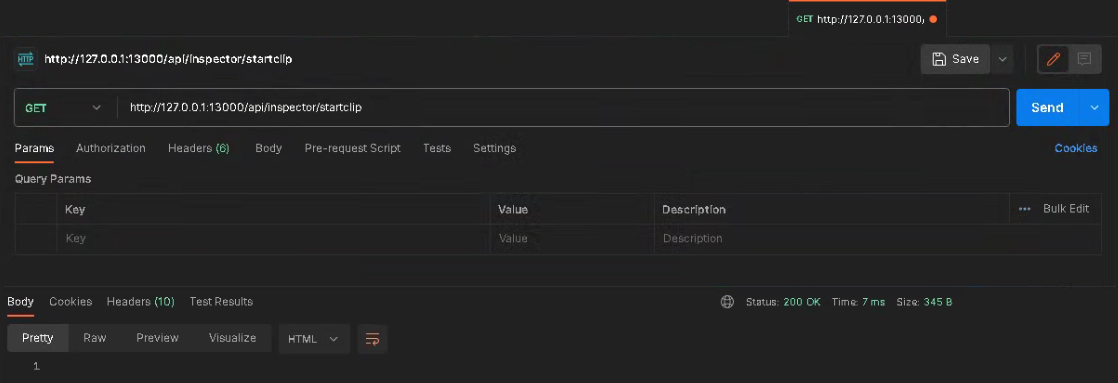
Steps:
Open Postman.
Login to your Postman account.
Create a new tab.
Ensure the type is GET
Update the textbox to “http://127.0.0.1:13000/api/inspector/startclip”.
Remember to change the 127.0.0.1 to the IP address of the PC that is hosting the DVR+O you are targeting.Click the Send button.
Stop a Video Clip
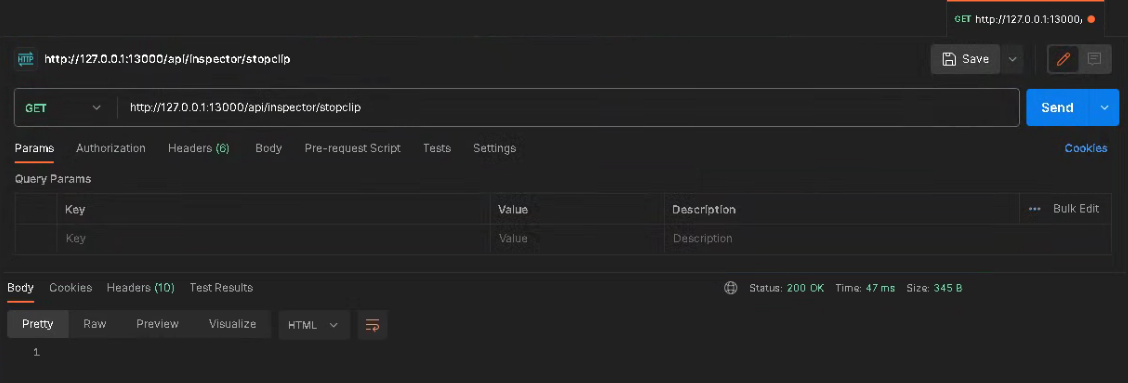
Steps:
Open Postman.
Login to your Postman account.
Create a new tab.
Ensure the type is GET
Update the textbox to “http://127.0.0.1:13000/api/inspector/stopclip”.
Remember to change the 127.0.0.1 to the IP address of the PC that is hosting the DVR+O you are targeting.Click the Send button.
Check if the Video Clip Recording has Started.

You can check if the video clip recording has started by using the “iscliprecording” command.
Steps:
Open Postman.
Login to your Postman account.
Create a new tab.
Ensure the type is GET
Update the textbox to “http://127.0.0.1:13000/api/inspector/iscliprecording”.
Remember to change the 127.0.0.1 to the IP address of the PC that is hosting the DVR+O you are targeting.Click the Send button.