Data I/O
SubC Stream Desktop provides the option of getting Data from other applications or devices, such as those reporting EXIF (metadata about an image, including camera settings, date and time, depth, altitude and GPS location information) and this data can be saved to the Still image file.
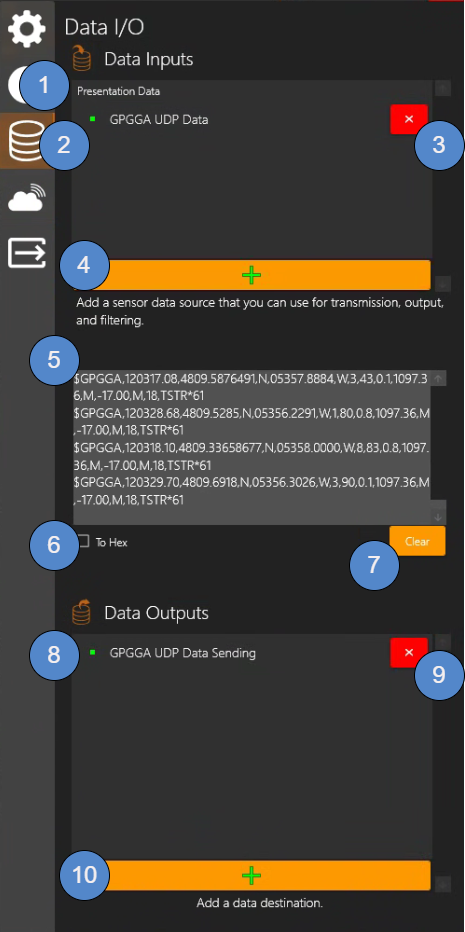
Data I/O
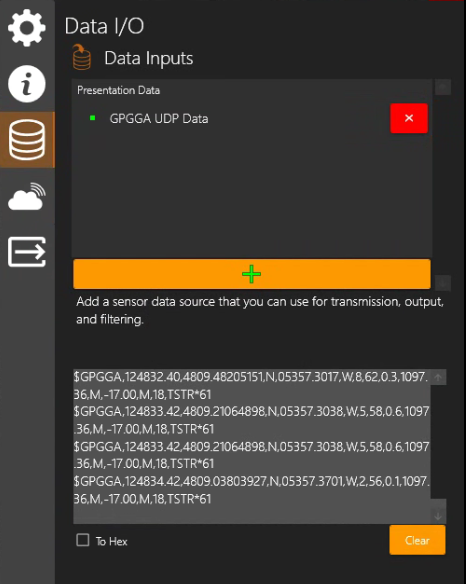
Data Inputs
Presentation Data - If you have a Channel configured with Presentation as Input type, and if that source Presentation is also streaming data, that Presentation Data will automatically appear in Data Input.
Data Source - Example named “GPGGA UDP Data” is data from source such a NMEA sender from its Address IP and Port.
Click x if you wish to disconnect from the connected data source.
Add - Click + to add data source(s) from UDP, TCP, Serial &/or UDP Broadcast
Incoming Data Preview window shows the incoming data source data in this field.
To Hex checkbox – converts incoming data into Hexadecimal Notation format.
Clear - Click to remove/refresh the incoming data in the Incoming Data Preview window.
Data Outputs
Sending Data - Example named “GPGGA UDP Data Sending” via destination IP and port.
Click x if you wish to stop sending data to destination.
Add - Click + to add data output destination via UDP, TCP, Serial &/or UDP Broadcast
Configuring Data Input Overview
Start your Data Reporting application
In the UDP example below we are using a NMEA data generator running on the same PC (IP 127.0.0.1 Port 6677), but the data source can be running on another system within your network (Enter the data source system IP & Port number

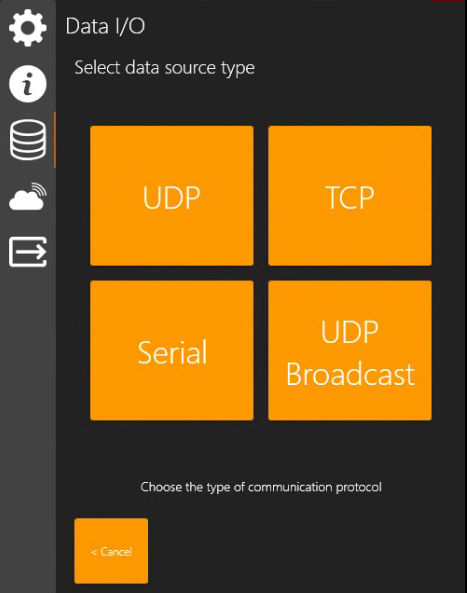
Click “+” Add button to add a data source
This will open the Select data source type window.Select the type of communication protocol, UDP, TCP, Serial, or UDP Broadcast for your data input.
These Data Inputs can then also be used for Data Output (transmission), logging, and filtering.
Data Input Types: UDP or TCP
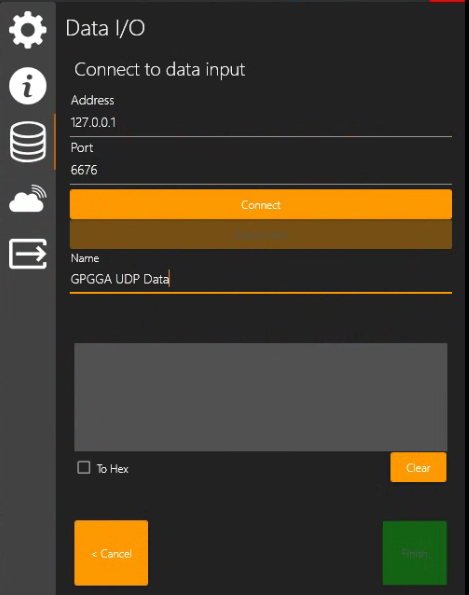
If you select UDP or TCP, the Connect to data input configuration window will appear.
Address: Enter IP Address of data source
Port: Enter port number of data source
In this example, the Data source feed is on the same PC hosting the Stream desktop application, so we are using loopback IP 127.0.0.1 and Port 6676 (UDP).
Name: It is optional to give your data input a name, but you will likely find it helpful to do so.
Connect: Click to connect to the data source
Disconnect: Once connect to the data source, the Disconnect button will become available. Click Disconnect if you wish to stop the data input. The Connect button will then once again become activated.
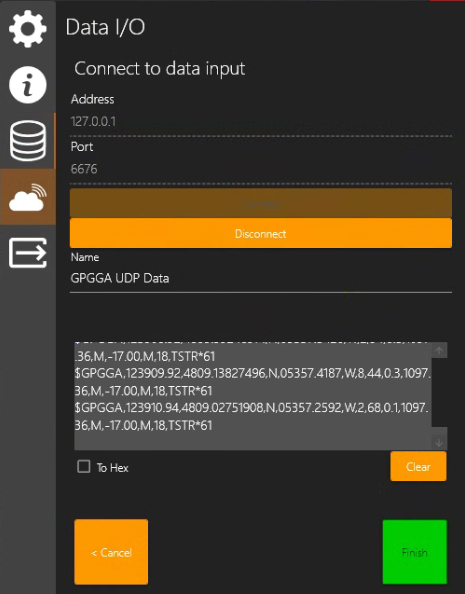
When connected to data source:
Data Preview: This window will populate with incoming data after you click Connect.
To Hex: Converts incoming data into Hexadecimal Notation format.
Clear: Refreshes the incoming data log in the Data Preview window.
Cancel: Closes the Data Input configuration window and returns to the Data Input window.
Finish: To complete the data Input connection and proceed to the next screen - which is described below.
After you click Finish to conclude the Data Input configuration, the Data Inputs window is displayed again and lists the current active data input(s).
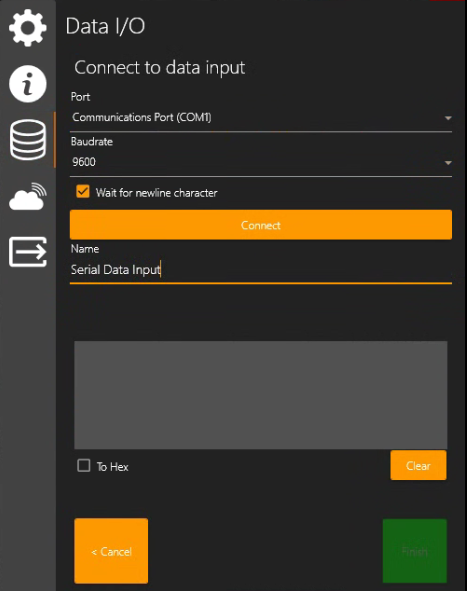
Data Input Type: Serial
Connect to data input
The following Connect to data input window for Serial connections appears.
Port: Select a serial port from the dropdown list
Baudrate: The rate at which information is transferred in a communication channel.
In the serial port example, "9600” baud rate means the serial port is capable of transferring a maximum of 9600 bits per second.
Wait for newline character: Select this checkbox to ensure that the full data strings are transmitted before processing.
Name: It is optional to give your data input a name, but you will likely find it helpful to do so.
Connect: To connect to the data source
Data Preview: Once connected, incoming data will appear in the Data Preview window.
To Hex: Converts incoming data into Hexadecimal Notation format.
Clear: Refreshes the incoming data log in the Data Preview window.
Cancel: Close the Data Input configuration window and returns to the Data Input window.
Finish: To complete the Data Input configuration.
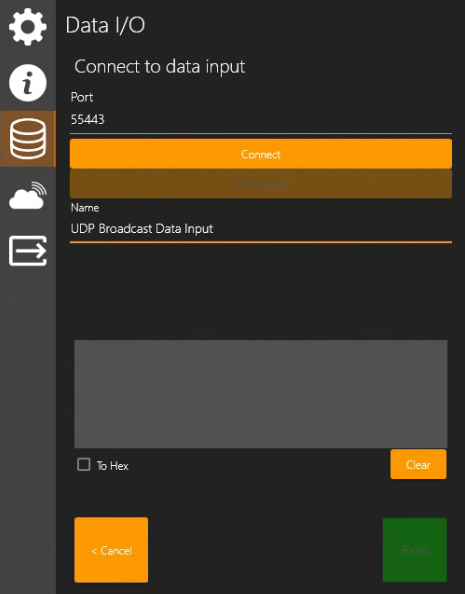
Data Input Type: UDP Broadcast
Select UDP Broadcast to connect to data being broadcast over your network by specifying Port only.
Name: It is optional to give your data input a name, but you will likely find it helpful to do so.
Click Connect and you will see the data in the Data Preview window.
Click Finish and you will see your new Data Input name listed in the Data Inputs list.
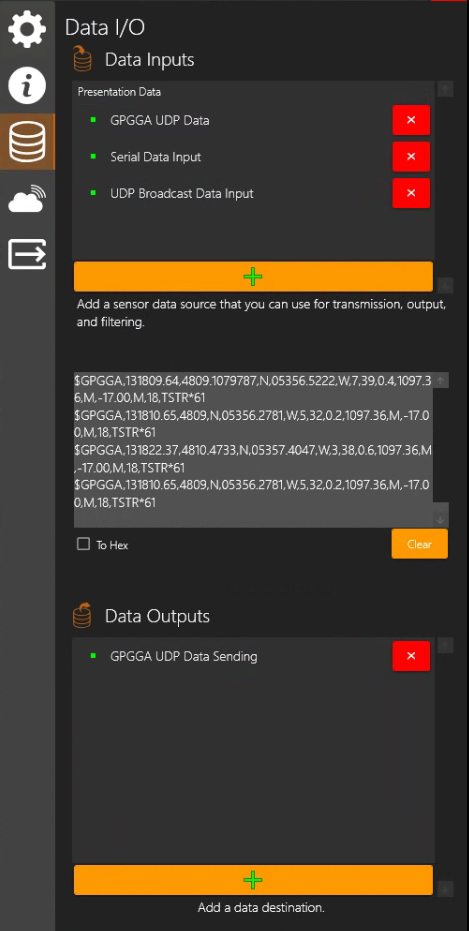
Examples of Connected Data Inputs
UDP (or TCP)
Serial
UDP Broadcast
Incoming Data can now also be Output to another system through Data Outputs and also see Output - RTSP Lan Streaming & HD/SD Output