Deployment
1. Preparing and Arming the Rayfin System for Deployment
This guide covers the steps for preparing both the Rayfin Benthic and Rayfin Benthic Hibernation systems for deployment, including connecting to the power supply, arming the system for autonomous time-lapse operations, and ensuring everything functions as expected.
1. Preparing the Camera for Deployment
Once the autonomous operations of the Rayfin camera system have been validated in the Bench Test, the system is ready to be deployed using a battery power supply.
Disconnect Equipment: Remove the camera and any auxiliary devices from the water, disconnecting the DBH13F test whip from the camera.
Battery Connection: Connect the fully charged battery to the camera using the DIL13F to MCIL3M cable. The camera will power up and begin executing the onboard script.
Testing the Battery: Run the system in the water until the battery depletes. Monitor the battery life to determine how long the camera can operate under the current setup. For more details, refer to the Power Consumption and Storage section.
Verify Data Capture: Check the camera's media folder to ensure the expected number of videos or still images have been captured. Once verified, clear the camera's internal storage.
Recharge: Recharge the battery and reconnect it to the camera system when ready to deploy in the field.
2. Arming the System
After preparing the camera for deployment, the system needs to be "armed" to ensure it begins executing the pre-defined script autonomously.
Arm the Script to Execute on Start:
In the Rayfin SCI (SubC Rayfin Single Channel Inspection), open the Menu and navigate to Other Rayfin Settings.
In the Scripting section, open the SubC Rayfin Visual Script Builder
Choose the script you want to arm, then click Arm Script. You should see your selected script name listed as "armed," confirming it is ready for automatic execution upon boot.

Power Off the System: After arming the system, remove power from the camera.
Deploy and Activate the System: When ready to deploy, connect the camera to the battery. Wait for approximately 55 seconds for the camera to boot up, initiate the script, and begin the autonomous operation cycle.
Monitor Initial Cycle: During the first cycle, observe the camera’s operation to ensure it is functioning as expected. This includes verifying that the lights flash or turn on the correct number of times, as defined in your script. This confirms the system is operating correctly.
Ready for Deployment: If everything checks out, the camera system is ready for deployment.
3. Connecting the System to the Battery
There are many factors to consider when setting up and deploying the camera system in the field, such as mounting methods, placement in the water, and retrieval options. However, for the purposes of this section, we will focus on connecting the system to the battery for deployment.
Ensure Proper Connections: Ensure that all connectors are appropriately greased and that locking sleeves are securely in place before placing the system in the water.
Auxiliary Devices: If using auxiliary devices like LEDs or lasers, connect them according to the wiring diagram provided. Note that these are optional components and are not required for the basic operation of the system.
4. Autonomous System Diagrams
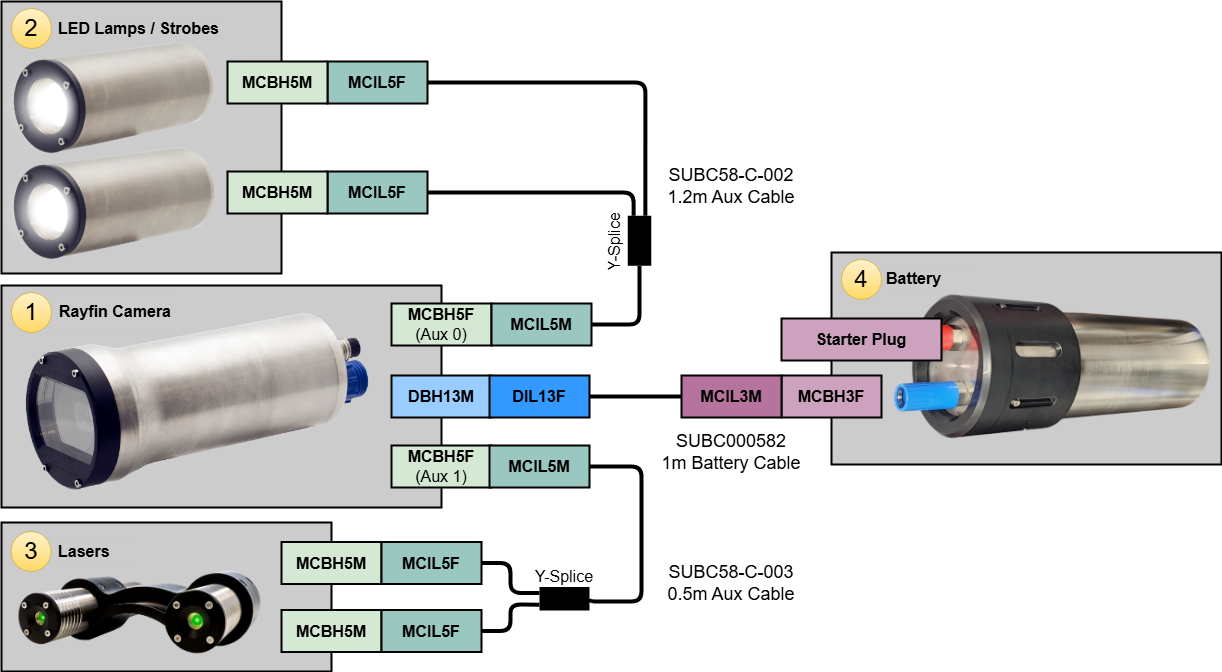
Autonomous Example Diagram A: this represents a typical setup for an autonomous camera system, with two LEDs and parallel lasers.
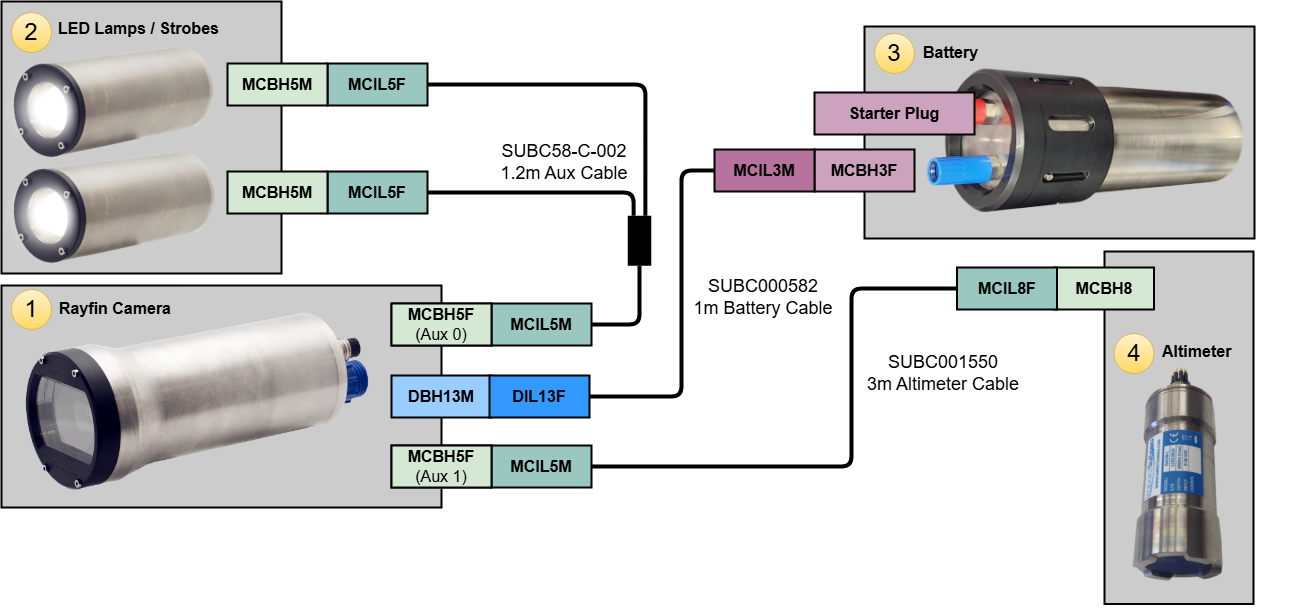
Autonomous Example Diagram B: this setup adds an altitude sensor in place of the lasers. The system is then able to trigger LEDs, recording or digital stills based on the distance to seafloor.
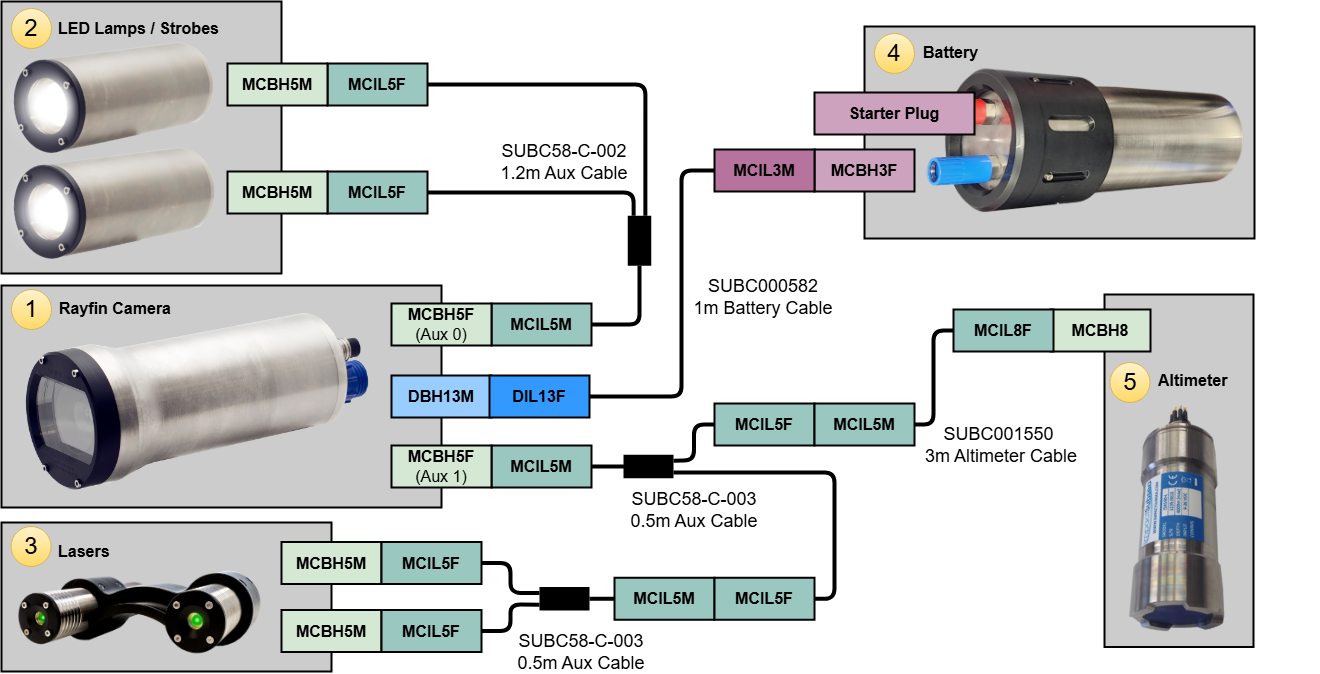
Autonomous Example Diagram C: this represents a system where LEDs and lasers are enabled and recording or digital stills are triggered based on the distance to seafloor from the attached altimeter.
Ensure that all connectors are appropriately greased and have secured locking sleeves before putting the system in the water.
For more technical details on your Rayfin camera, please see the datasheets.
Please note that the diagrams above are examples of wiring diagrams for camera system deployments. Please note that the only components required for the Autonomous Timelapse to function are the Rayfin Benthic(Hibernation) camera and the Battery. The lights and lasers are auxiliary devices that are not necessary but can be purchased from SubC to add flexibility capabilities to your system.