Home Groups - SSW
When your company subscribes to SubC Streaming Services, Stream Service Groups(s) are created for your company and Members of the Group are created using each User's email address (i.e., name@yourcompany.com). See User Accounts - SubC Streaming Services
Open SubC Streaming Service web application and login with your Streaming Service Account (your company email address).
If you need to reset you Stream Service Account Password, See Reset a forgotten Microsoft account password

Click Menu → Home to display the Groups UI in the Streaming Services Web application.
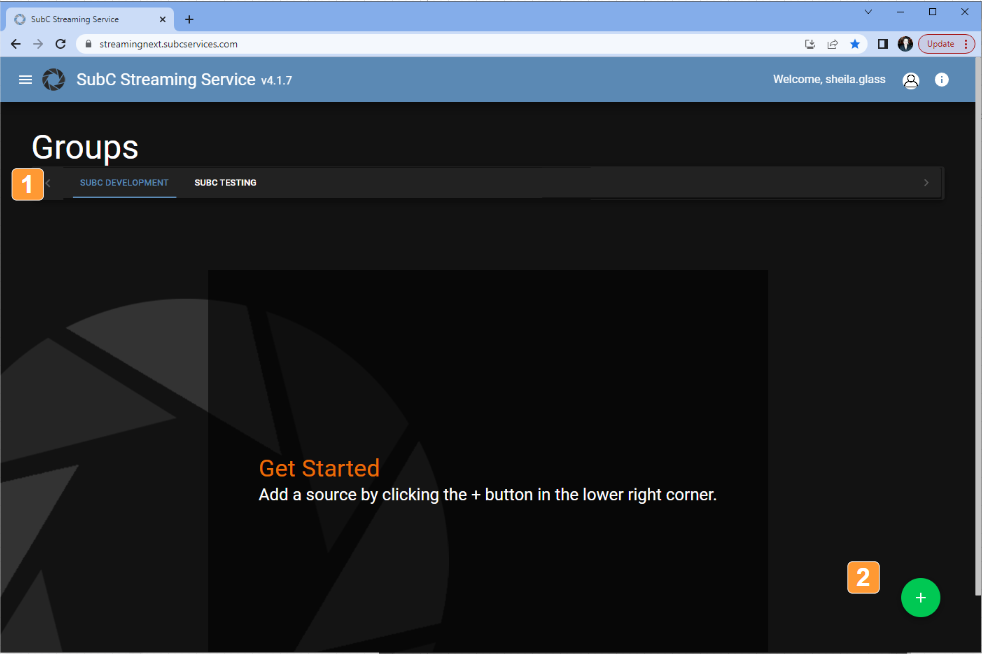
Your organization's Group(s) will be displayed on the top bar.
Select a Group.
If you see the Getting Started message, this means that your Group does not currently have any Sources (Stream enabled desktop applications) opened.
If Sources have not yet been added to your Group, you will also see the Getting Started message.
Click the “+” green circle to add a new Source system to the Group. Follow the “Adding a Source to Streaming Service” instructions below.
Adding a Source to Streaming Service Web
Sources are PCs on your network that have SubC Stream enabled desktop applications installed, such as SubC Stream, Blackbox or DVR+Ov7 / SCI desktop applications.

In the SubC Streaming Service web application, click the green “+” button to generate an Activation code to add a system running a streaming enabled SubC Stream desktop application to the current SubC Streaming Service Group.
The following “Link to Group” window will appear displaying the current Group (i.e., “SubC Development”)
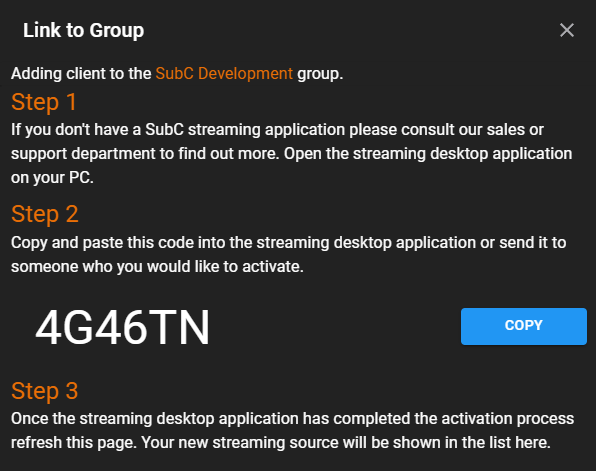
Open your Stream enabled desktop application on your PC.
A unique Activation code is generated that is to be applied in the Stream enabled desktop application to join the SubC Streaming Service Group.
See FAQ: Activate a New PC in SubC Stream.Once the Activation code is applied to Stream enabled desktop application, refresh the Streaming Service Web application page, then you will see and can remotely interact with the PC running the Stream enabled desktop application.
Remote Control Stream Desktop Systems
SubC Stream enabled desktop application currently running on system(s) that are a member of your Group will be visible and configurable in the SubC Streaming Service web application under your Group.
Example
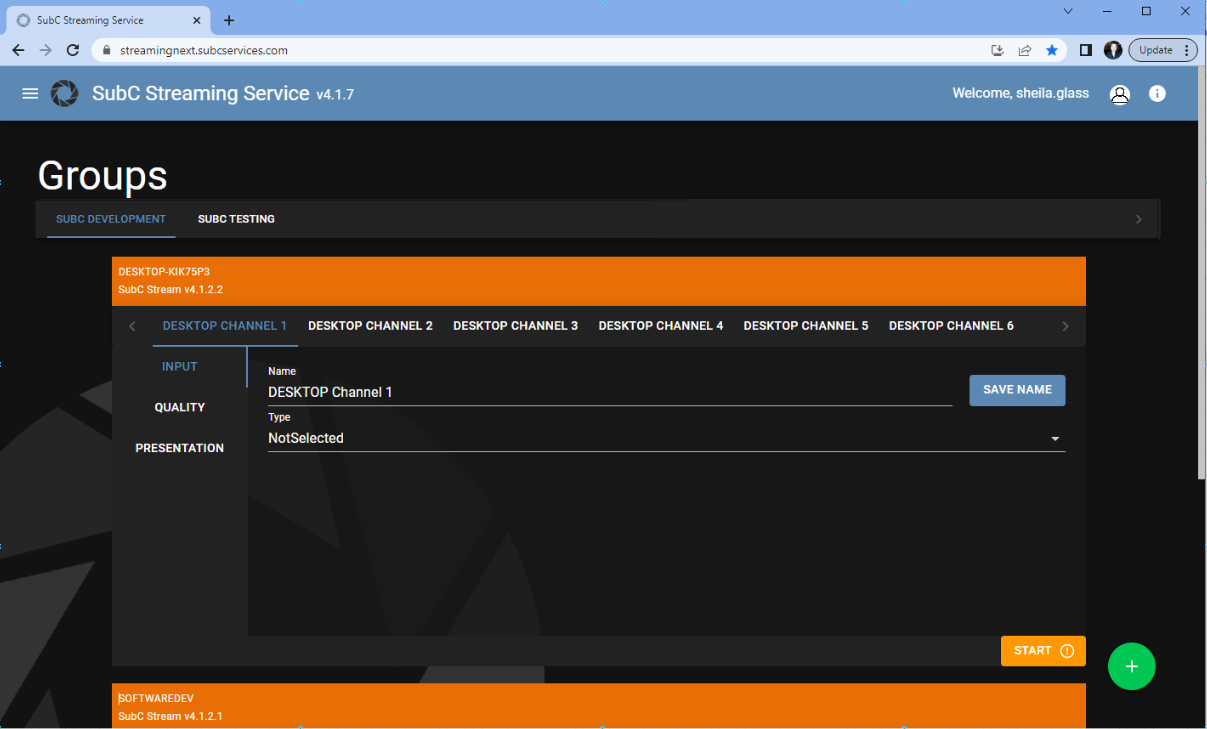
In this image, under “SUBC DEVELOPEMENT” Group, we see “DESKTOP-K1K75P3” is a SubC Desktop application member of this Group.
We can see “DESKTOP-K1K75P3” is running the SubC Stream Desktop application, its software version, and below, we see its 6 Input Channels.
“DESKTOP CHANNEL 1” is selected (when a channel is selected, it will appear blue)
Each Channel has INPUT, QUALITY and PRESENTATION menu.
The sections below describe how you can remotely configure Stream Fugro desktop application Channels with Capture Card, IP Camera, RTSP Address, Screen Capture, Window Capture and Presentation Input options through SubC Streaming Service web application.
Configuring a Channel
INPUT Menu
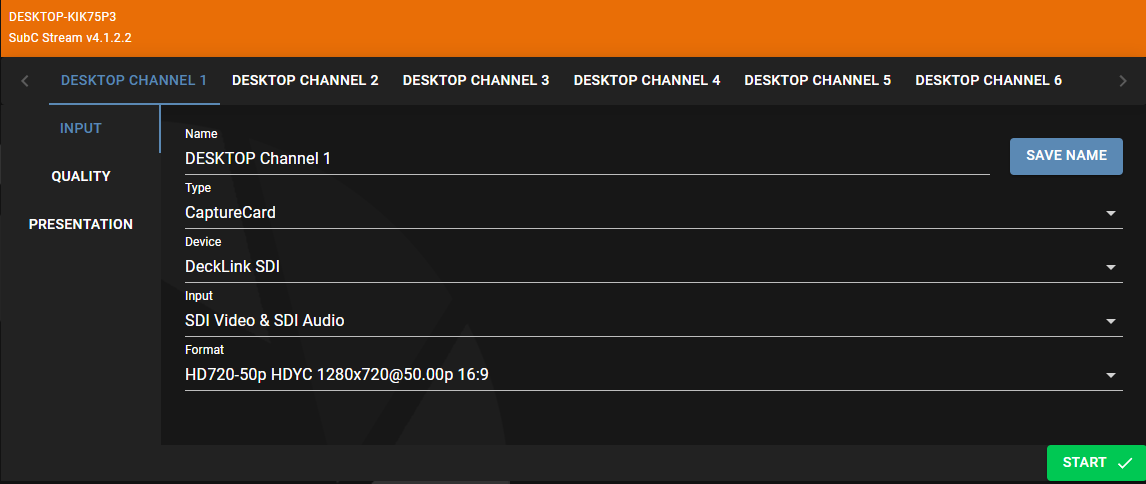
Name - Displays the PC’s hostname by default
Example: “DESKTOP Channel 1”.
You can change the name of the Channels as you wish to a name that is meaningful, such as the name of the video input, camera or its location, and click the SAVE NAME button.Type - Choose an Input Type from this dropdown field.
Capture Card
IP Camera
RTSP Address
Screen Capture
Window Capture
Presentation
Capture Card
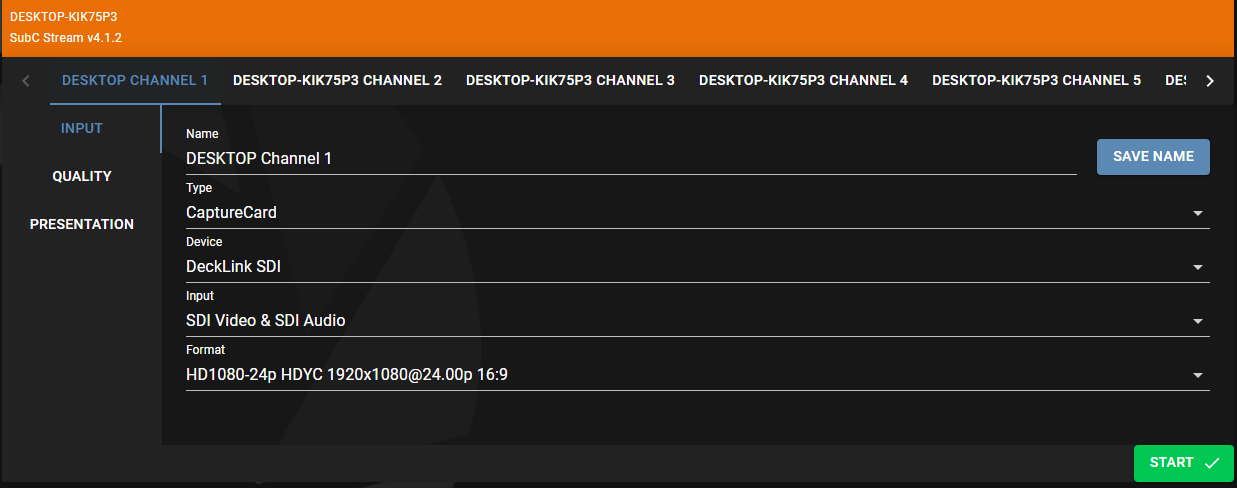
Type - Capture Card
Device - Select your Capture Card (I.e., “DeckLink SDI”)
Input - Select the input that corresponds to the Capture Card
Format - Select the preferred format.
The formats present in this list will depend on what your capture card supports; formats may be different than those listed here.Format Options:
NTSC-23p UYVY 720x486@23.98p 4:3
HD720-50p HDYC 1280x720@50.00p 16:9
HD720-59p HDYC 1280x720@59.94p 16:9
HD720-60p HDYC 1280x720@60.00p 16:9
HD1080-23p HDYC 1920x1080@23.98p 16:9
HD1080-24p HDYC 1920x1080@24.00p 16:9
HD1080-25p HDYC 1920x1080@25.00p 16:9
HD1080-29p HDYC 1920x1080@29.97p 16:9
HD1080-30p HDYC 1920x1080@30.00p 16:9
Click Start
IP Camera Input
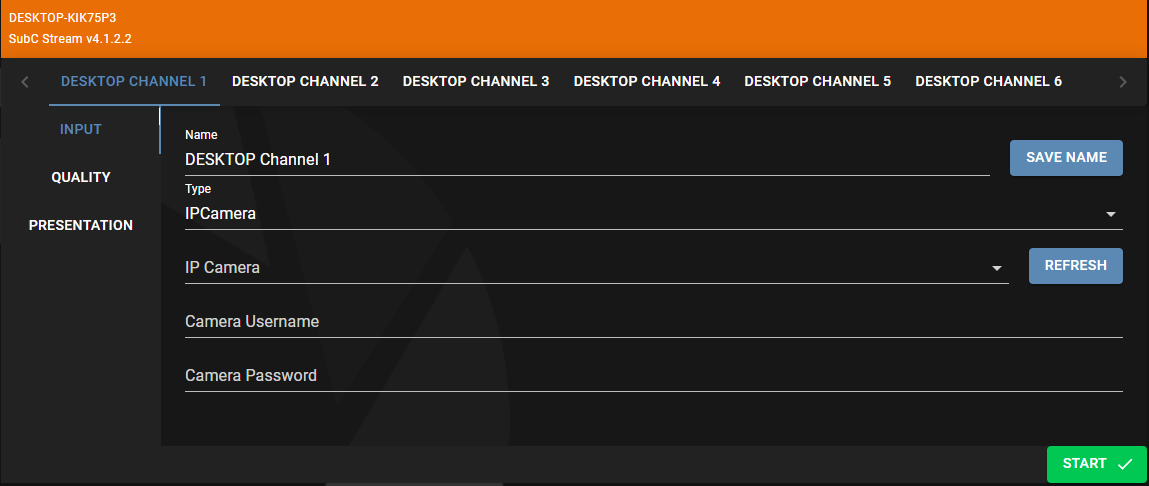
Type - IP Camera
IP Camera - Select an IP Camera
Click the browser Refresh button if you don’t see an IP Camera listed that you are expecting to see. The IP Camera must be powered up and connected on your Network.
If the Camera selected requires authentication, the Camera Username & Camera Password fields will appear. Enter the camera username & password.
Click Start to connect to the video source and start streaming
RTSP Address Input
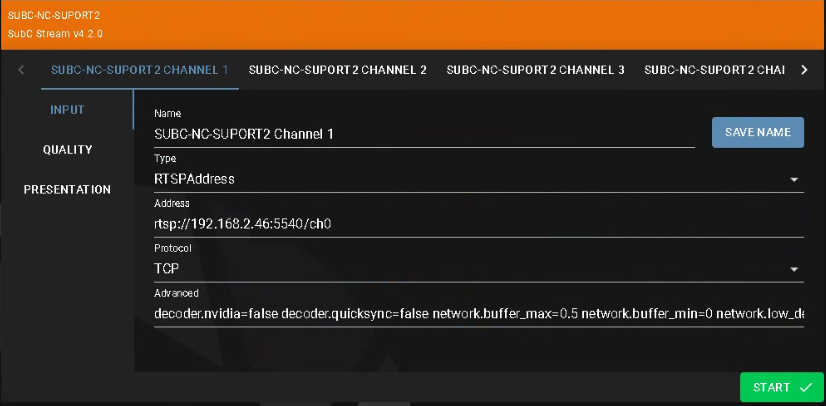
Type - RTSP Address
Address - Enter RTSP video input source address
Protocol - Select Default, UDP or TCP
Advanced - Optional parameters. Use the default values or you can modify these values if necessary. The example shows default values corresponding to those in the Stream Desktop “Show Advance” field: decoder.nvidia=false decoder.quicksync=false network.buffer_max=0.5 network.buffer_min=0 network.low_delay=true loop=true
Click Start to connect to the video source and start streaming
Screen Capture

Type - Screen Capture
Screen capture will take the Stream Desktop PC’s full monitor view as input
Click Start to connect to the video source and start streaming
Window Capture
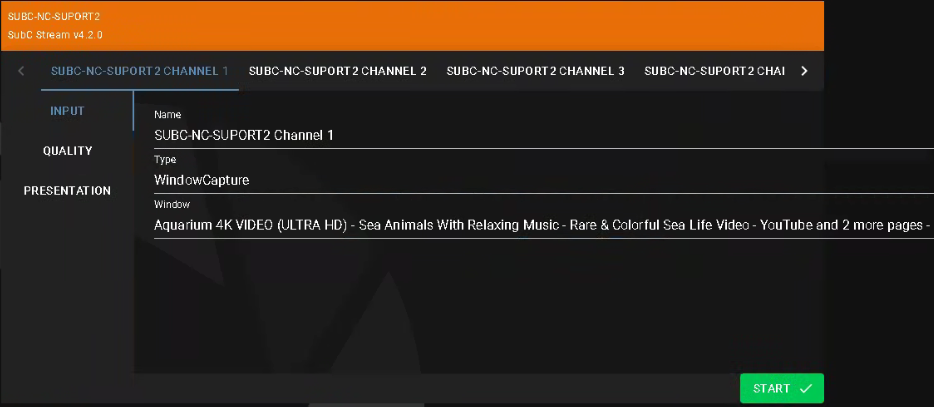
Type - Window Capture
Window - Select from a list of names of active Windows open on the Stream Desktop PC.
Note: The selected Window must not be minimized.If you do not see the name of the window you wish to select in the list, click the Refresh button and check the dropdown list again.
Click Start to connect to the video source and start streaming
Presentation Input
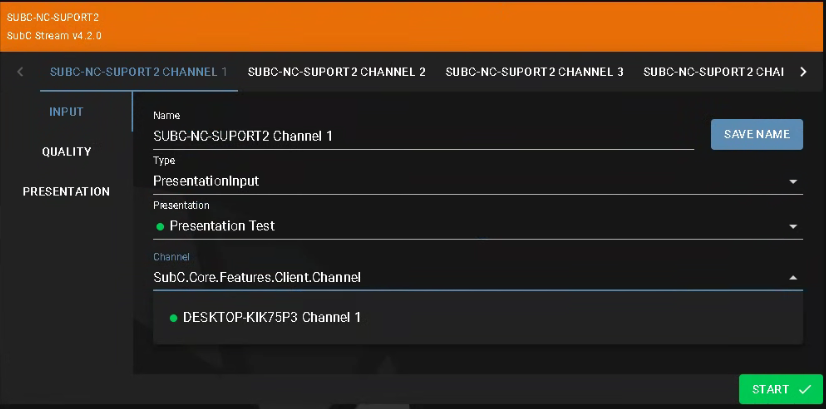
Type - Presentation Input
Presentation - Select the Name of an active Presentation
Illuminated green dot indicates the Presentation has actively streaming video input.Channel - Select the Channel that is the video source streaming to the Presentation.
Click Start to connect to the video source and start streaming
The Presentation source Channel that is selected as Presentation Input must come from another system running a SubC Stream enabled desktop application. The Streaming Service Web application does not permit taking the streaming video from one Channel as Presentation Input to another Channel on the same Stream Desktop system.
QUALITY Menu
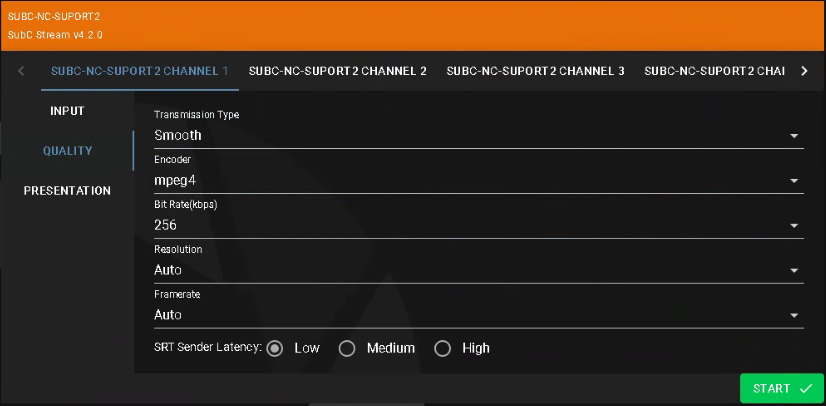
Transmission Type - In this dropdown filed, displays/allows choice of RealTime or Smooth
Encoder
Default is mpeg4 when Transmission type Smooth has been selected
Options vp9, gpu_h264 or h264 are available when Transmission type RealTime has been selected.
Bit Rate (kbps) - Options are 1024, 768, 512,256, 128, 64
Resolution - Options are Auto, 1920x1080, 1280x720, 720x480
Framerate - Options are Auto, 30, 20, 15, 5
SRT Sender Latency: Low | Medium | High selection only appears when Transmission Type Smooth is selected.
PRESENTATION Menu

Presentation - Select a Presentation from this dropdown field. The Presentation(s) that have been created for this Group will appear in the list.
In this image example, “Full Demo” Presentation is selected and shows Audio Chat and Data options have been applied when this Presentation was created.
See Presentations section for how to create Presentations.
Streaming Location - Select a SubC Stream Server from this dropdown field.
You can select any of these SubC Stream Servers, however generally it is best to select a Stream Server nearest to your geographical location.
Click the Start button to begin Streaming when you have completed the Channel configuration.
Starting and Viewing
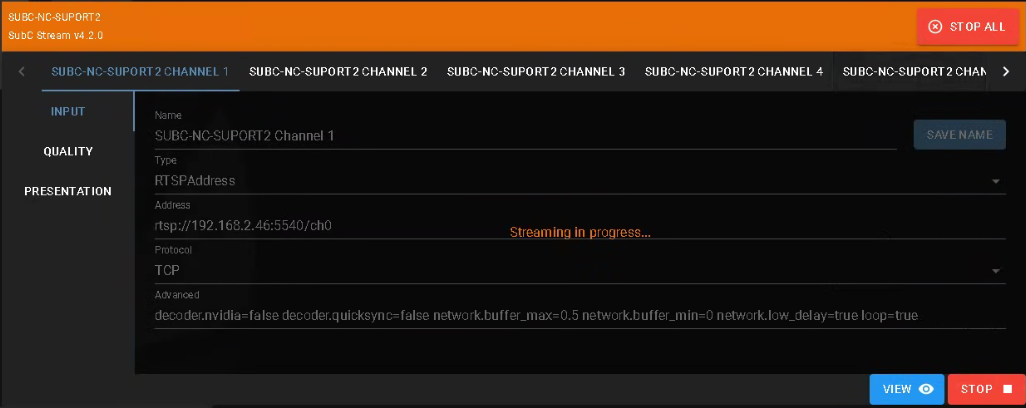
When Streaming is activated:
“Streaming in progress” message will appear on the Channel.
Click the View button to see the channel streaming video.
Click the Stop button to stop streaming.
In the top, right of the UI, Stop All button is convenient if you wish to stop all of the active streaming channels with one click.