Quick Start Guide - Rayfin Benthic 6000m, Single Channel Inspection
A Message from SubC Imaging
Dear Valued Customer,
Thank you for choosing SubC Imaging's Rayfin Benthic 6000m camera. Our team has meticulously assembled your shipment and crafted this guide to ensure your seamless experience. Should you have any questions or require assistance, our dedicated support team is always here to help.
We take pride in our commitment to quality, reliability, and customer satisfaction. Your satisfaction is our priority.
Warm regards,
___________________________________________
SubC Quality Assurance Team
Introduction
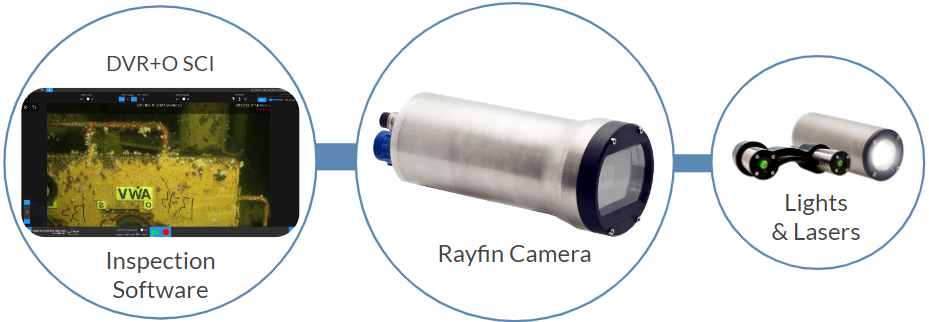
This is the Quick Start Guide for the SubC Rayfin SCI, specifically for the Rayfin Benthic model. The Rayfin Single Channel Inspection suite is an all-in-one, comprehensive solution for inspections and surveys. This cutting-edge solution combines topside DVR + Overlay software with SubC’s industry-leading cameras. It is designed for real-time operations, with live digital stills, HD video, and image enhancement. This solution also contains the common features needed for a subsea inspection or survey, including overlay/annotation, blackbox recording, and dive logging.
BLANK
Schedule Training and Onboarding
Contact us to schedule onboarding and training with SubC’s team of experts. Then continue with this guide to set up and test your system. More training resources are available here.
Book Direct via Calendar: Appointments
Phone: +1 (709) 702-0395
Hours of Operation: 1100 - 1900 UTC, Monday - Friday (excluding holidays)
Package Contents
Your shipment will contain the necessary components to power up and test the camera system. This includes the interface cable, USB stick with software, AC-DC power supply, Cat5e Ethernet cable, Aux devices such as LEDs or lasers and necessary cables to connect equipment.
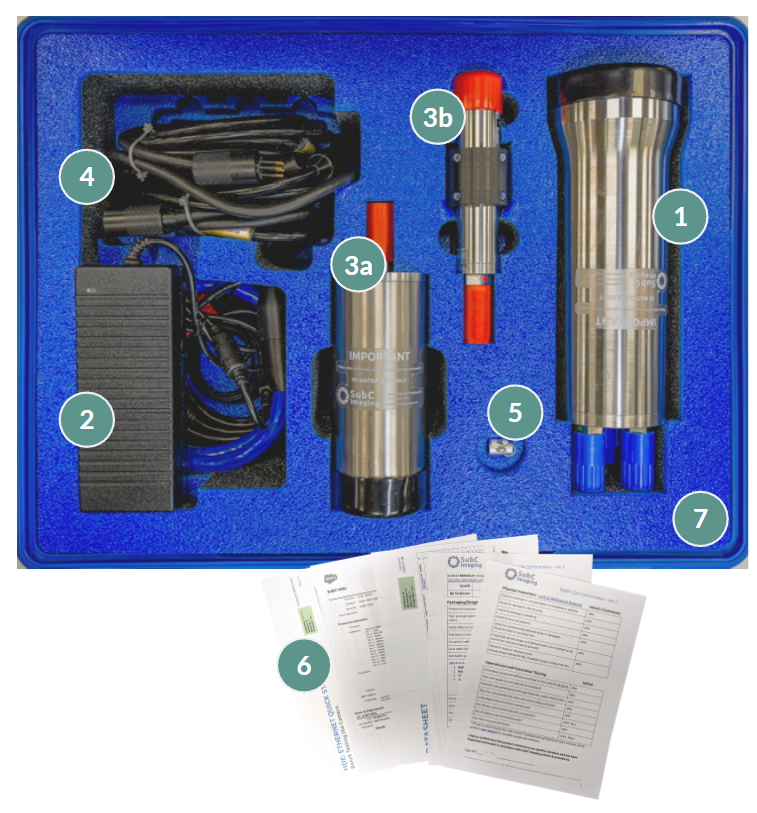
Rayfin Benthic Camera
Component compartment:
DBH13F test whip bench testing the camera and downloading offline
AC cable (matching your region) and AC-DC power supply (24VDC)]
Optional Aux Devices:
Aquorea LED(s)
MantaRay or Skate Laser(s)
Aux device cabling
USB flash drive with Rayfin Control SCI Software and Documents and (optional) physical CodeMeter key
Printed Documentation (located under packaging foam)
Impact-resistant shipping case with designed foam insert
Please Watch the Unboxing Video
Install DVR+O SCI software
Check that your PC meets the minimum specifications: System Requirements
Plug the USB flash drive into your PC or laptop. It contains the software installer. You can also get the latest software at https://getdvr7.subcservices.com/
Install the software following the steps outlined in this section: License Options & Software Installation
Open the
 DVR+O SCI software from the Desktop
Hardware setup for bench testing
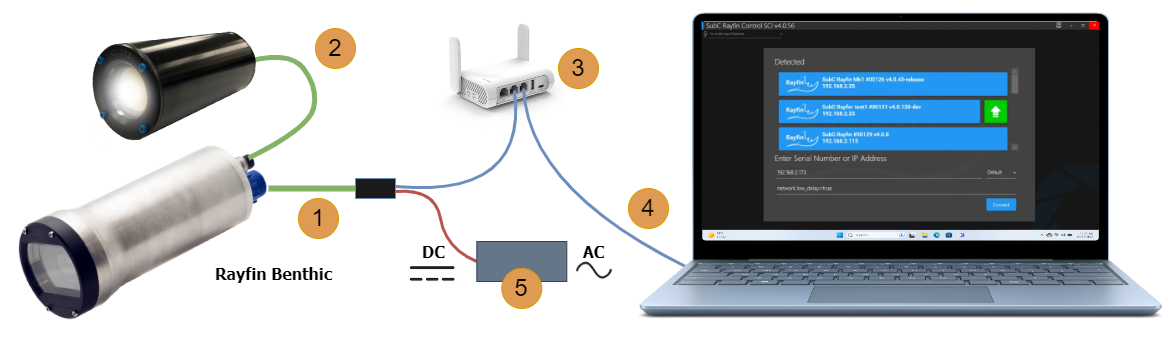
Connect and power up all devices for bench testing.
For safety reasons, please refer to the section in the guide: Before Starting Your Next Inspection or Survey
Connect the Interface Cable to the camera. Its Ethernet and DC power jacks can identify it.
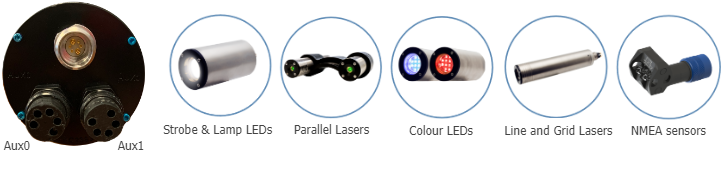
If LEDs or lasers were delivered with your Rayfin SCI system, a 5-pin Aux cable will be included. Connect the Aux devices to the ports on the back of the camera. Examples of Aux devices are below.
Connect the Interface cable to the LAN port on the Ethernet device (router or switch).
Connect the Windows 10 or 11 PC to the second LAN port of the Ethernet device.
Connect the AC-DC power supply to the Interface Cable to power up the Rayfin. Depending on the network setup, it can take up to 60 seconds to detect the Rayfin camera.
Rayfin simplifies integration by supporting Aux Devices such as LEDs, Lasers, and NMEA sensors.
Using the DVR+O SCI software with the Rayfin
This powerful and easy-to-use software remotely controls all camera features and functionality. It records video, captures still images, overlays text, graphics, and data on the video, has image enhancement, and more.
The PDF version of the DVR+O SCI manual is packaged with the software. In the top right of the software click the  button and it will open on your PC.
The online version of the DVR+O SCI Manual is located at SubC Client Help Center
After applying power, the Rayfin should boot up and display in the software in less than 60 seconds. If it doesn’t detect, please refer to this section: Troubleshooting Networking with Rayfin v4
To start using the software with the Rayfin, please go to the DVR+O SCI Manual - Rayfin Camera Controls.
For more detailed settings and information, please review the DVR+O SCI Manual - Stills Setting section through to Other Rayfin Settings.
There will be tutorial videos and webinars available at the SubC Tutorial & Webinar Videos
For bulkhead pinouts and technical specs, refer to the datasheets here: Camera Datasheets
Do you need help?
Help Center: SubC Client Help Center
Email: support@subcimaging.com
Phone: +1 (709) 702-0392
Hours of Operation: 1100 - 1900 UTC, Monday - Friday (excluding holidays)